Log Profiles

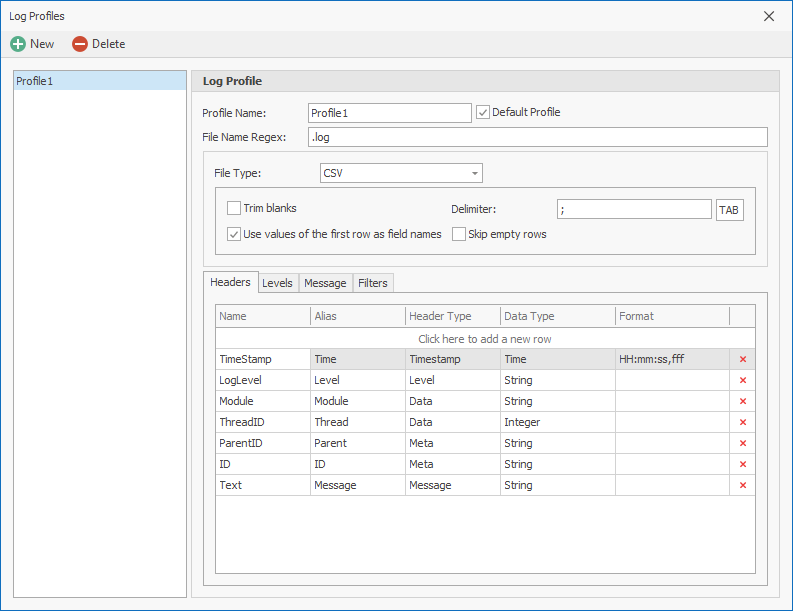
The Log Profiles feature in LogLab allows users to define specific settings that LogLab will apply when opening log files. By creating log profiles, users can streamline the process of configuring log file parameters, ensuring consistency and efficiency in log analysis. This feature supports detailed customization of log file handling, from defining headers and log levels to setting up filters and message pane settings.
Key Features:
-
Profile Definition:
- Users can create and name log profiles, specifying criteria for log file names using REGEX.
- Select the file type; currently, LogLab supports CSV log files.
-
Headers Tab:
- Define headers for the log files with the following attributes:
- Name: The actual name of the header in the log file.
- Alias: The display name used in the grid.
- Header Type: Can be one of the following:
- Timestamp: For date-time values.
- Level: For log level values.
- Message: For the log message value, which will be shown in the Message details pane.
- Data: For data columns that will appear in the log entries grid and can have filters applied.
- Meta: For extra values that will not be shown in the log entries grid and do not require filtering; they will appear in the Meta Data pane.
- Define headers for the log files with the following attributes:
-
Levels Tab:
- Define log level values and assign aliases and images for each log level.
- Customize how log levels are displayed and interpreted in the log entries grid.
-
Message Tab:
- Define settings for the Message pane, including how the message value will be highlighted.
-
Filters Tab:
- Display and manage saved filter criteria specific to the log profile.
How It Works:
-
Creating a Log Profile:
- Open the Log Profiles window from the Ribbon's 'File' menu.
- Define the profile name and set the log file name REGEX criteria.
- Select the file type (currently, CSV is supported).
-
Configuring Headers:
- Navigate to the Headers tab.
- Define each header's name, alias, and type (Timestamp, Level, Message, Data, Meta).
-
Setting Up Log Levels:
- Navigate to the Levels tab.
- Define log levels, assign aliases, and choose images for each level.
-
Customizing Message Pane:
- Navigate to the Message tab.
- Define settings for how the message content will be displayed and highlighted in the Message details pane.
-
Managing Filters:
- Navigate to the Filters tab.
- View and manage saved filter criteria that will be applied when the log profile is used.