
Logs Analyzer & Viewer Tool
It is a powerful tool designed to process, interpret, and visualize log data generated by various systems, applications, and services.
This application is crucial for developers, system administrators, and IT professionals who need to monitor system health, debug issues, and ensure optimal performance.
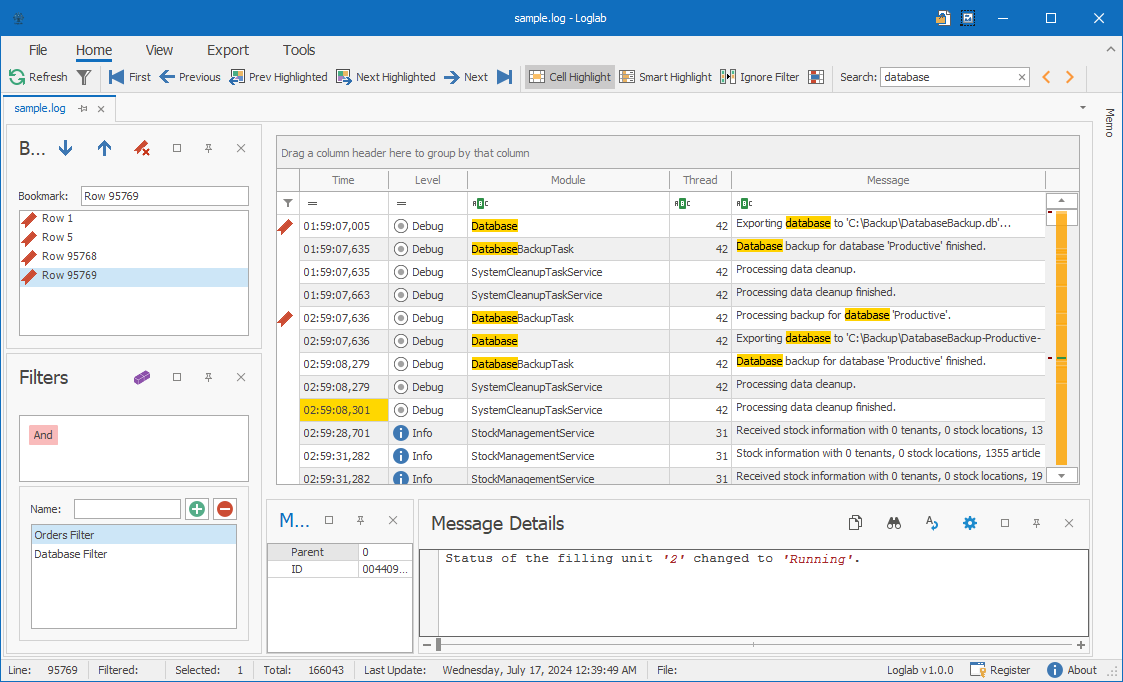

Features
Discover the powerful features that make LogLab stand out and enhance your experience.
User-Friendly Interface
-
Intuitive Design: LogLab features a clean and intuitive design, ensuring a seamless user experience.
-
Customizable Layouts: Personalize your workspace with customizable layouts to suit your preferences and workflow.
-
Dark Mode: Reduce eye strain and work comfortably in low-light environments with our dark mode option.
-
Variety of Themes: Choose from a variety of themes to match your personal style and preferences.
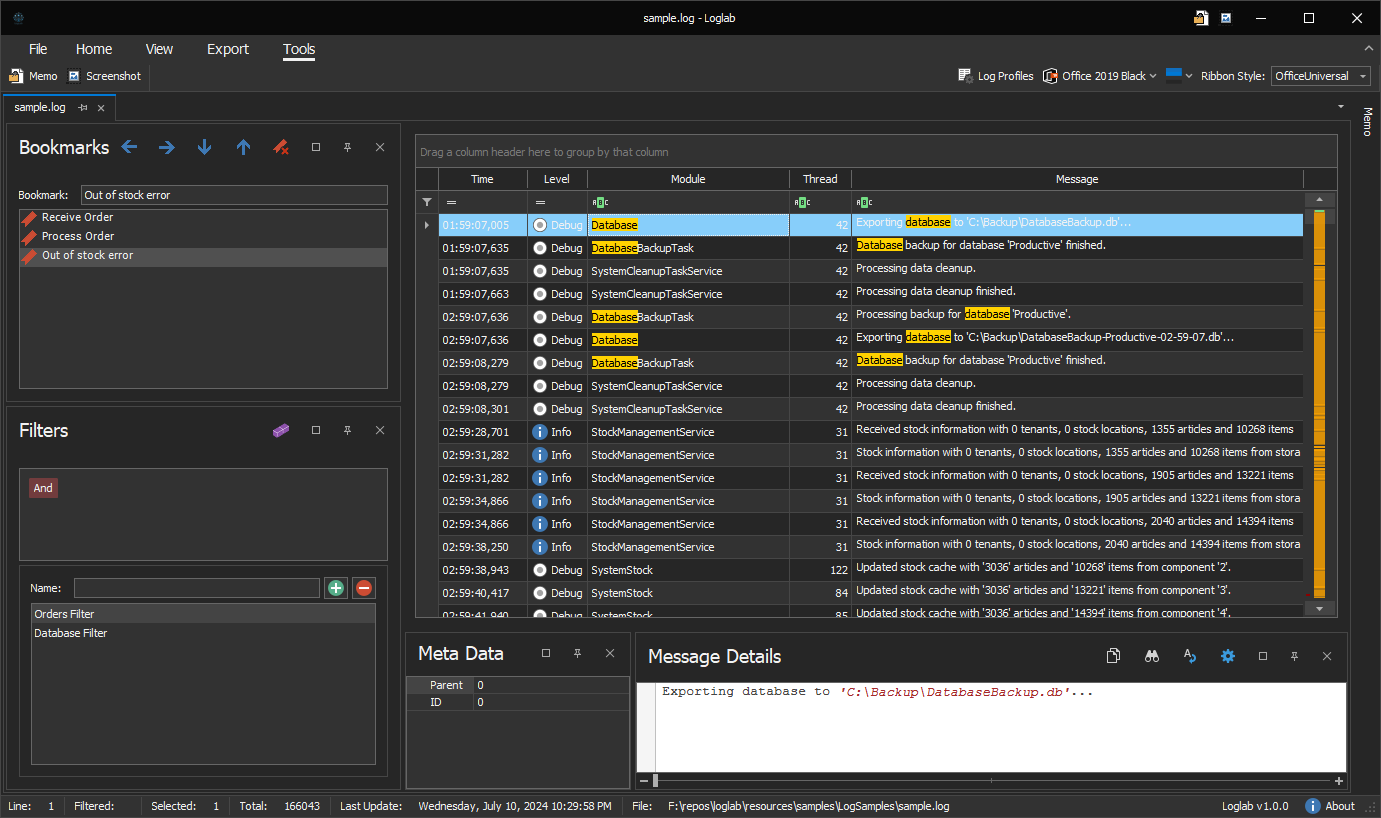
Search & Filtering
-
Effortless Search: Quickly find relevant information with our advanced search capabilities.
-
Filter Options: Easily filter data based on multiple criteria to focus on what matters most.
-
Custom Filters: Create and save custom filters for recurring queries or tasks.

Bookmarks
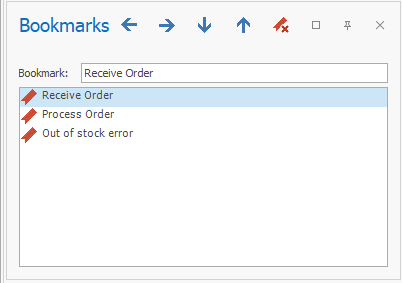
Easily navigate and manage important log entries with the bookmarks feature in our Logs Viewer and Analyzer. Bookmarks allow you to mark specific log entries for quick access and further analysis. Whether you need to monitor recurring issues, track important events, or simply want to revisit specific entries later, bookmarks provide a convenient way to organize and prioritize your logs.
-
Quick Access: Instantly jump to bookmarked log entries directly from the bookmarks panel.
-
Flexible Management: Create, edit, and delete bookmarks effortlessly to keep your log views organized according to your workflow.
Row Highlights and Coloring
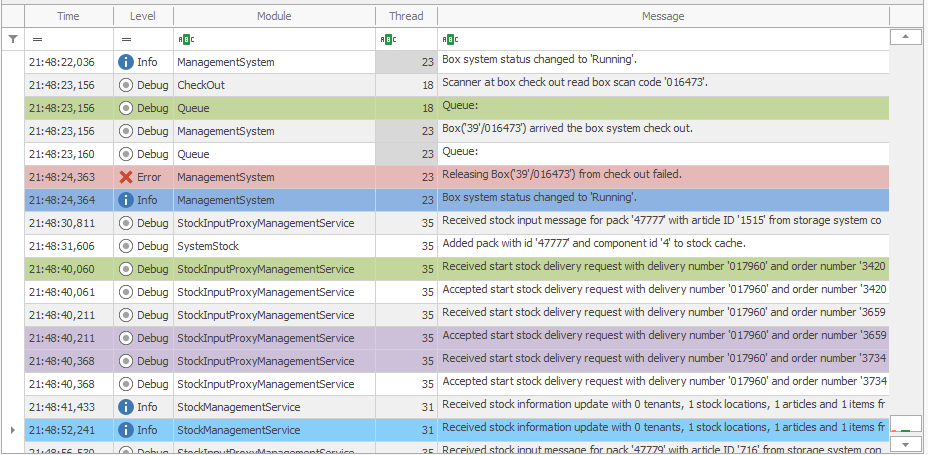
Customize your log viewing experience with the rows highlights and coloring feature in our Logs Viewer and Analyzer. This powerful feature allows you to visually distinguish and prioritize log entries based on criteria that matter most to you. Whether you need to quickly identify errors, warnings, or specific types of events, row highlights and coloring provide flexibility and clarity in managing your log data.
-
Customizable Rules: Define rules to automatically highlight rows based on log levels (e.g., error, warning, info), keywords, timestamps, or any other criteria relevant to your application and environment.
-
Visual Clarity: Instantly spot critical information through color-coded rows, making it easier to focus on important events or anomalies within your logs.
Syntax Highlighting
Enhance readability and streamline log analysis with syntax highlighting in our Logs Viewer and Analyzer. Syntax highlighting breaks up log messages visually by applying distinct colors to different components such as timestamps, log levels, keywords, and more. This feature significantly improves the speed and accuracy of processing log information, enabling users to quickly identify key details and patterns within their log data.
-
Intelligent Parsing: Automatically identify and highlight key components of log messages, log messages are parsed and analyzed in real-time as they are loaded into the viewer.
-
Visual Clarity: Differentiate between different parts of log message at a glance, making it easier to focus on critical issues or specific types of events.


License
LogLab is free software available for use by everyone. LogLab offers comprehensive log analysis features with some limitations in its default mode. Users have the option to register to unlock additional capabilities.
Free Usage
By default, LogLab allows users to read and analyze the first 5000 rows of a log file. This is sufficient for many common use cases and provides a robust introduction to LogLab's powerful features.
Registration Benefits
To unlock the full potential of LogLab, users can register their copy of the software. Registration expands the log file reading capability significantly, enabling LogLab to read up to one million rows in a log file. This is particularly beneficial for users dealing with large log files or requiring more extensive analysis.
Registration Cost
Registration is completely free. There is no cost associated with registering LogLab. Users can unlock the full functionality of the software without any financial commitment.
Registration Benefits
To unlock the full potential of LogLab, users can register their copy of the software. Registration expands the log file reading capability significantly, enabling LogLab to read up to one million rows in a log file. This is particularly beneficial for users dealing with large log files or requiring more extensive analysis.
How to Register
- Download and Install: If you haven't already, download and install LogLab from our official website.
- Open LogLab: Launch the application.
- Register: Navigate to the registration option in the application. Follow the prompts to complete your registration.
- Unlock Full Access: Upon successful registration, the limitation of reading only the first 5000 rows will be lifted, allowing access to up to one million rows per log file.
Privacy
-
LogLab software does transmit any personal or system related information without the user consent.
Software registration requieres to provide user email, company name and machine ID. Data will not be shared with third party -
This website uses Google Analytics services, which collects session data about every pageview. The data is used only to understand better the public behavior towards this tool.

Contact Us
We'd love to hear from you! If you have any questions, feedback, or need support, please feel free to reach out to us.
How to Reach Us
You can contact us by sending an email to:


Installation
Windows Installation
LogLab, our intuitive Logs Viewer and Analyzer application for Windows, requires no formal installation process. Follow these straightforward steps to start using LogLab:
-
Download LogLab:
- Visit our website or designated download page.
- Locate and click on the download link for the Windows version of LogLab.
-
Unpack the Archive:
- Once the download completes, navigate to the location where the file was saved.
- Extract the contents of the downloaded archive (typically a ZIP file) to a folder of your choice on your local machine.
-
Launch LogLab:
- Open the folder where you extracted LogLab.
- Find and double-click on the
LogLab.exefile to launch the application.
System Requirements
- Operating System: Windows 10, 11
- Disk Space: Minimum 350MB of free disk space required for the application files.
- RAM: Minimum 8GB of RAM recommended for optimal performance during log data processing.
Additional Information
- No Installation Necessary: LogLab operates as a standalone executable, eliminating the need for a traditional installation process.
- Portable Usage: You can run LogLab from any location on your system without affecting system settings or requiring administrative privileges.

User Interface
The User Interface (UI) of LogLab is designed to provide an intuitive, efficient, and user-friendly experience for log analysis. With a well-organized layout and easy access to powerful features, the UI ensures that users can navigate and utilize the application effectively, enhancing their productivity and ability to analyze log data.
Key Components:
-
Ribbon:
- The ribbon at the top of the interface provides quick access to various tools and features. It is organized into tabs such as Home, View, Export, and Tools, each containing specific options to streamline your workflow.
-
Main Grid:
- The central area where log entries are displayed in a tabular format. The main grid supports sorting, searching, and selecting log entries for detailed analysis.
-
Bookmarks Panel:
- A sidebar that lists all bookmarked log entries for quick reference. Users can easily add, edit, or remove bookmarks.
-
Filter Builder Panel:
- A sidebar for creating and applying custom filters to narrow down log entries based on specific criteria. This helps in focusing on relevant data.
-
Saved Filters Panel:
- Displays all saved filters for easy application. Users can manage these filters by editing or deleting them as needed.
-
Message Details Panel:
- Provides a detailed view of the selected log entry, including the full log message, timestamps, and other relevant data. This panel helps in-depth analysis of individual entries.
Benefits:
- Efficiency: The organized layout and intuitive design enhance the user's ability to navigate and analyze log data quickly.
- Customization: Users can personalize the interface by adjusting themes, color schemes, and view options to match their preferences and needs.
- Comprehensive Tools: The UI provides access to a wide range of tools and features, making log analysis thorough and efficient.
The User Interface of LogLab is crafted to facilitate a seamless and productive log analysis experience, ensuring that users can efficiently manage, analyze, and interpret their log data.

Main Windows
LogLab's interface is designed to provide an efficient and intuitive log analysis experience, with a layout consisting of several key components: the ribbon, main grid, bookmarks panel, filter builder panel, saved filters panel, and message details panel. Each of these components plays a vital role in streamlining the process of viewing, filtering, and analyzing log entries.

Key Components:
-
Ribbon: The ribbon is located at the top of the LogLab interface, providing quick access to various tools and features. It includes buttons for common actions such as opening log files, exporting data, applying themes, navigating log entries, and more. The ribbon is organized into tabs for easy navigation.
-
Main Grid: The main grid is the central area where log entries are displayed. It provides a detailed, tabular view of your log data, allowing you to scroll through and examine individual entries. The main grid supports sorting, searching, and selecting log entries for further analysis.
-
Bookmarks Panel: Located on the side of the interface, the bookmarks panel lists all the bookmarks you have created. It allows you to quickly jump to important log entries that you have marked for easy reference. Bookmarks can be added, edited, or removed as needed.
-
Filter Builder Panel: The filter builder panel is used to create custom filters for your log data. You can define conditions based on log entry attributes such as severity, date, and content. This panel helps you narrow down the log entries to those that meet specific criteria, making it easier to focus on relevant data.
-
Saved Filters Panel: This panel displays all the filters you have saved for future use. You can apply these filters to the main grid to quickly view log entries that match predefined conditions. Saved filters can be managed by editing or deleting them as needed.
-
Message Details Panel: The message details panel provides a detailed view of the selected log entry. When you select a log entry from the main grid, the message details panel displays additional information such as the full log message, timestamps, and any other relevant data. This panel helps you gain a deeper understanding of individual log entries.
Layout Overview:
- Ribbon: Located at the top, providing access to tools and features.
- Main Grid: Central area displaying log entries in a tabular format.
- Bookmarks Panel: Sidebar showing a list of bookmarked log entries.
- Filter Builder Panel: Sidebar for creating and applying custom filters.
- Saved Filters Panel: Sidebar listing all saved filters.
- Message Details Panel: Bottom or side panel displaying detailed information about the selected log entry.

Ribbon Control
The Ribbon control in LogLab is designed to provide quick and easy access to a wide range of features and tools. It is organized into a 'File' menu and several tabs, each offering specific options to enhance your log analysis workflow. Below is an overview of the available options and their functionalities.
File Menu
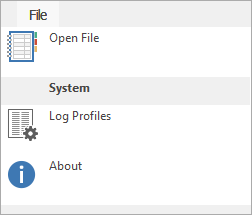
The 'File' menu contains three essential buttons:
-
Open File:
- Use this button to open log files from your file system. It allows you to quickly load the log data you need to analyze.
-
Log Profiles:
- This button opens the Log Profiles window, where you can define and manage log profiles for different log file types. Log profiles help you apply specific settings and parsing rules tailored to each log file format.
-
About:
- Click this button to open the About dialog, which provides information about the LogLab application, including version details and credits.
Ribbon Tabs
The Ribbon is divided into four main tabs: Home, View, Export, and Tools. Each tab contains various options to assist you in your log analysis tasks.
Home Tab

The Home tab includes options for navigating and searching log entries:
-
Navigation:
- Buttons to navigate to the first, previous, next, and last log entries.
- Buttons to jump to the next and previous color-highlighted entries.
-
Search:
- Search box and options to perform quick searches within the log entries.
View Tab

The View tab offers options to customize the appearance and layout of log entries:
-
Customize Rows:
- Options to adjust the row height, font size, and other visual aspects of log entries.
-
Zoom:
- Buttons to zoom in and out, providing better readability of log entries.
-
Show/Hide Panels:
- Options to show or hide various panels such as the bookmarks panel, filter builder panel, saved filters panel, and message details panel.
Export Tab

The Export tab provides options to save and share your log data in different formats:
- Export Options:
- Buttons to export log entries to PDF, XLS, or XLSX formats, enabling you to document and distribute your log information easily.
Tools Tab

The Tools tab offers additional tools and customization options:
-
Memo Tool:
- A free text editor for taking notes or recording keywords to be used later for searching or comparison.
-
Screenshot Tool:
- Options to capture screenshots of the log entries or the entire application window.
-
Themes and Color Schemes:
- Options to change the application theme and customize the color scheme, allowing you to personalize the look and feel of LogLab.

Themes
LogLab offers a versatile Themes feature, allowing users to personalize the look and feel of the application. Users can select from a variety of predefined themes, each with unique colors and styles, to enhance their log analysis experience. Additionally, LogLab provides customization options for users to create their own color schemes, ensuring a tailored and comfortable visual environment.
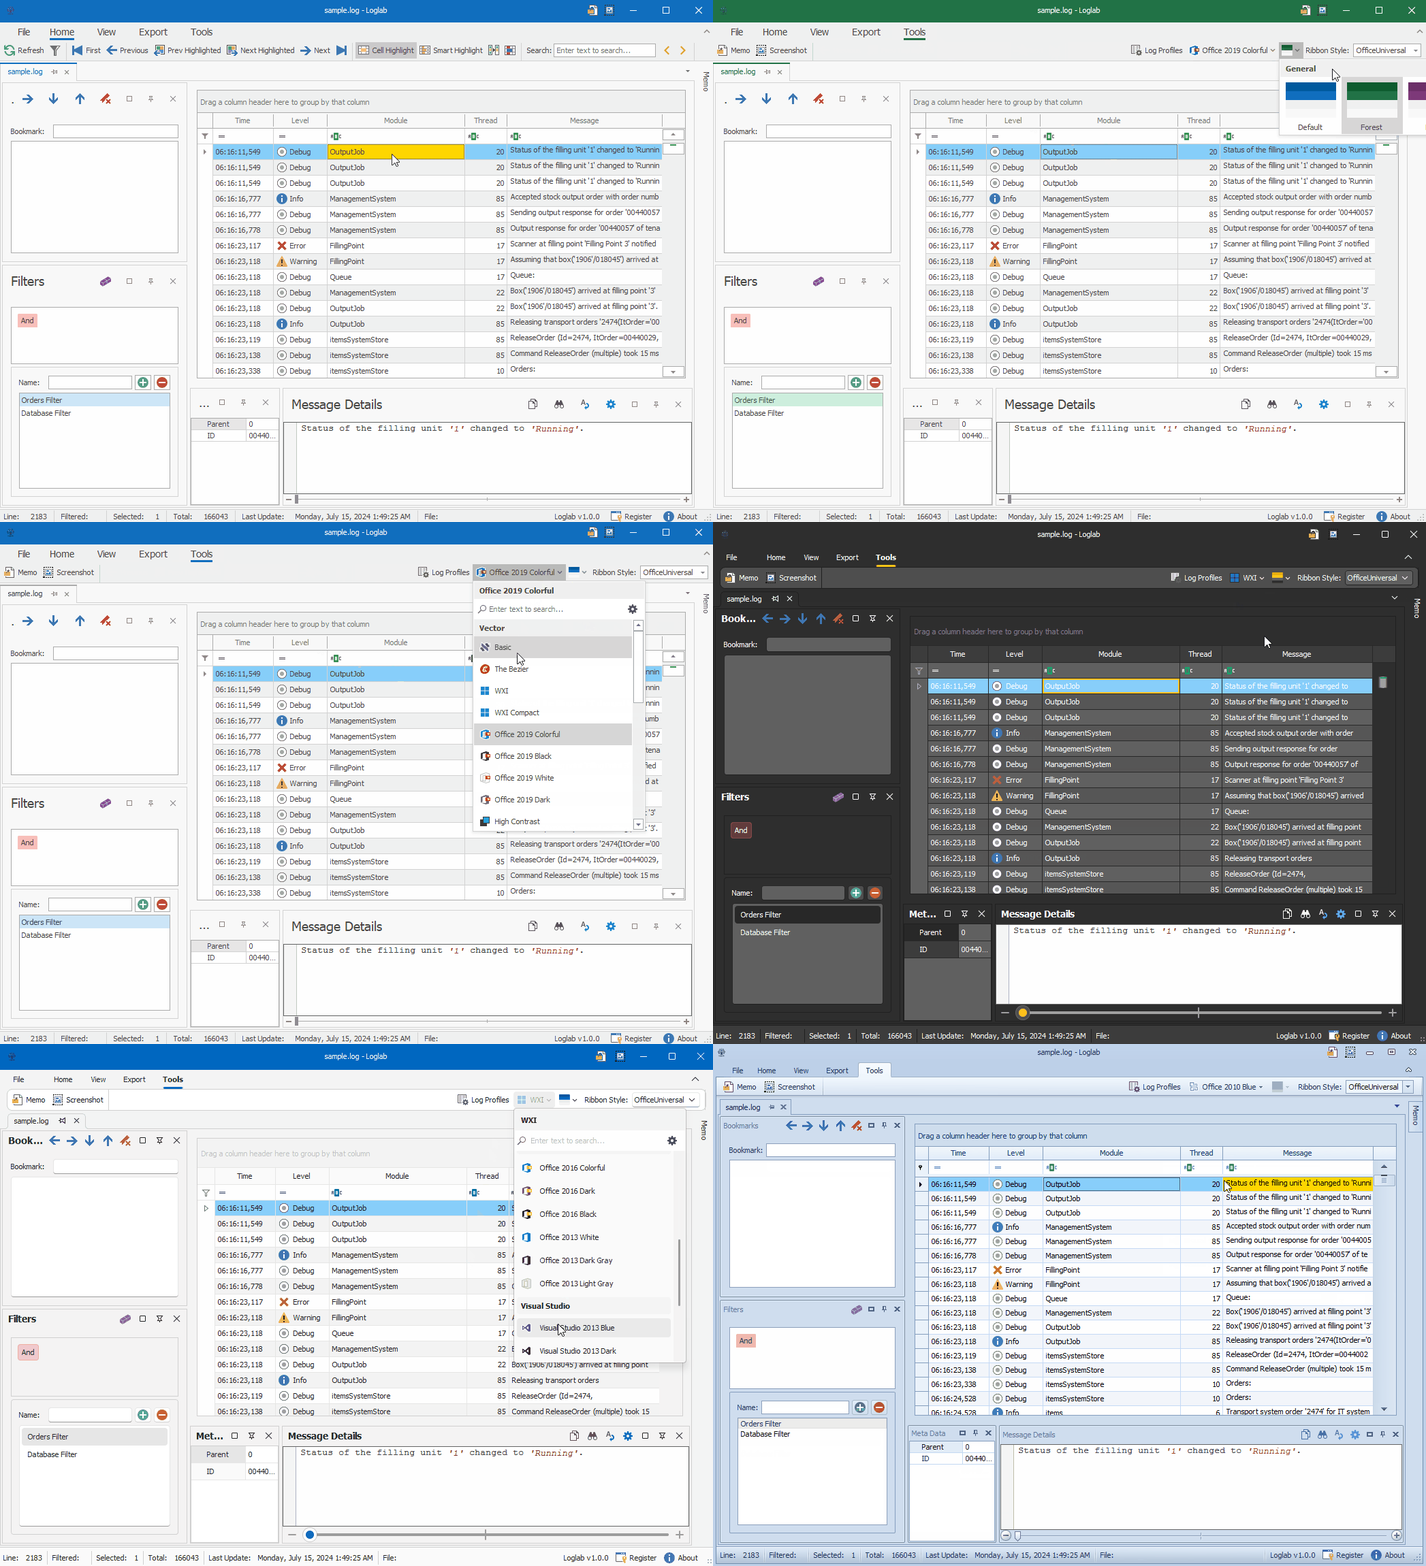
Key Features:
-
Predefined Themes: Choose from a collection of professionally designed themes, each offering a distinct combination of colors and styles to suit different preferences and needs.
-
Customizable Color Schemes: Modify existing themes, adjusting the foreground, background, and highlight colors to match your personal taste or specific requirements.
How It Works:
- Selecting a Predefined Theme:
- Open the Themes settings from the LogLab interface.
- Browse through the list of available themes.
- Click on a theme to preview it and apply it to the application.

Navigation
The navigation feature in LogLab provides a seamless and efficient way to move through log entries. With intuitive buttons available in the ribbon, users can quickly jump to specific log entries, enhancing the ease and speed of log analysis. This feature includes options to navigate to the first entry, next entry, previous entry, last entry, as well as the next and previous color-highlighted entries.

Key Features:
-
First Entry Navigation: Quickly jump to the very first log entry in the log file.
-
Next Entry Navigation: Move to the next log entry in sequence with a single click.
-
Previous Entry Navigation: Return to the previous log entry effortlessly.
-
Last Entry Navigation: Instantly navigate to the last log entry in the log file.
-
Next Color-Highlighted Entry: Skip ahead to the next log entry that has been color-highlighted, making it easier to find and focus on important events or errors.
-
Previous Color-Highlighted Entry: Go back to the previous color-highlighted entry, allowing for efficient review of key log events.
How It Works:
-
Using the Navigation Buttons:
- Access the navigation buttons located in the ribbon at the top of the LogLab interface.
- Click the respective button to navigate to the desired log entry:
- First:

- Next:

- Previous:

- Last:

- Next Highlighted:

- Previous Highlighted:

- First:
-
Navigating Through Log Entries:
- Use the navigation buttons to move through the log entries efficiently, minimizing the time spent scrolling through large log files.
- Focus on important log entries by jumping directly to color-highlighted entries, which are often indicative of significant events or errors.
Use Cases:
- Efficient Log Review: Quickly navigate to the beginning or end of a log file, making it easier to review logs from start to finish or to jump to the latest entries.
- Focused Analysis: Use the next and previous color-highlighted entry buttons to concentrate on significant log events without getting lost in less important entries.
- Streamlined Troubleshooting: Move through log entries methodically, ensuring no important entries are overlooked during the analysis process.

Rows View Feature
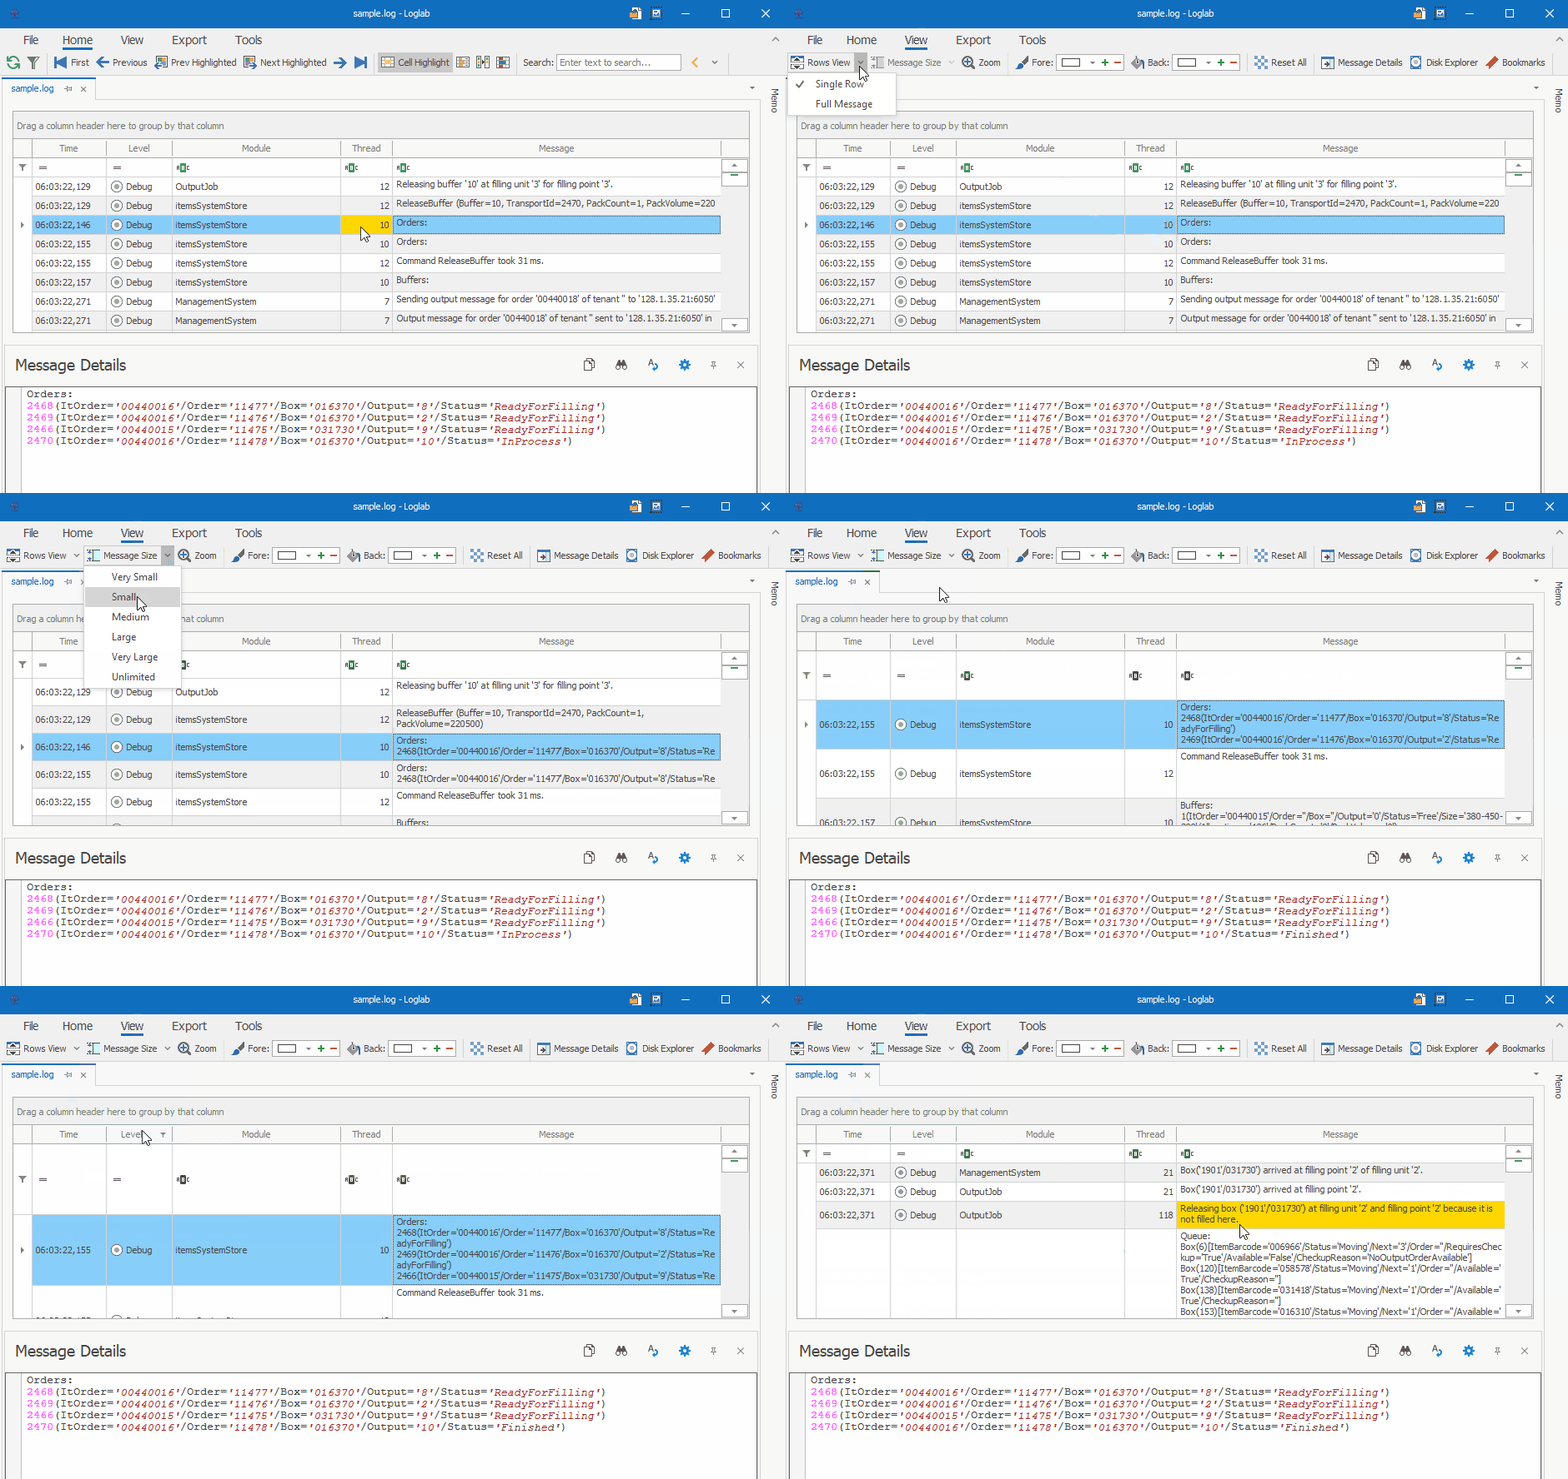
The Rows View feature in LogLab allows users to control how log entry rows are displayed in the grid, offering flexibility to view log messages according to their preferences. This feature includes two primary options for row display and additional controls to adjust the message size.
Key Features:
-
Single Row View:
- This is the default view that shows only the first row of the log entry message field, even if the message contains multiple rows. It provides a concise and compact view, making it easier to scan through log entries quickly.
-
Full Message View:
- This option displays more rows of the log entry message, allowing users to see the full content of the log message directly in the grid. It is useful for detailed analysis of log entries with multiline messages.
Message Size Control:
Users can further customize the Rows View by adjusting the message size. The following options are available to control how many rows of the message are displayed:
-
Very Small:
- Displays a minimal number of rows for each log entry message, providing a highly compact view.
-
Small:
- Shows a slightly larger portion of the message compared to the Very Small option, but still maintains a compact layout.
-
Medium:
- Balances between showing enough content of the message while keeping the view relatively compact.
-
Large:
- Displays a substantial portion of the message, suitable for users who need to see more details without expanding to the full message.
-
Very Large:
- Shows an extensive portion of the message, allowing for in-depth viewing of log entries with longer messages.
-
Unlimited:
- Displays the entire message regardless of its length, ensuring that all content is visible within the grid.
How It Works:
-
Selecting Rows View:
- Navigate to the 'View' tab in the ribbon.
- Choose between 'Single Row' or 'Full Message' to control the basic display of log entry rows.
-
Adjusting Message Size:
- In the 'View' tab, locate the 'Message Size' options.
- Select one of the following options: Very Small, Small, Medium, Large, Very Large, or Unlimited.
- The selected message size will determine how many rows of the log entry message are displayed in the grid.
Use Cases:
- Quick Scanning: Use the Single Row view with a Very Small or Small message size to quickly scan through a large number of log entries.
- Detailed Analysis: Switch to Full Message view with a Large or Very Large message size to analyze the content of multiline log messages in detail.
- Custom View: Adjust the message size according to your specific needs, ensuring an optimal balance between compactness and detail.
Benefits:
- Flexibility: Provides options to tailor the view of log entry rows according to user preferences and requirements.
- Efficiency: Enhances the ability to quickly scan or deeply analyze log entries by adjusting the message size.
- User-Friendly: Simple and intuitive controls in the ribbon for easy customization of the log entry view.

Zoom Feature
The Zoom feature in LogLab provides users with the ability to magnify or reduce the display of log entries and log messages for better readability and analysis. Users can zoom in two specific areas: the log entries grid and the log message in the Message Details pane.
Key Features:
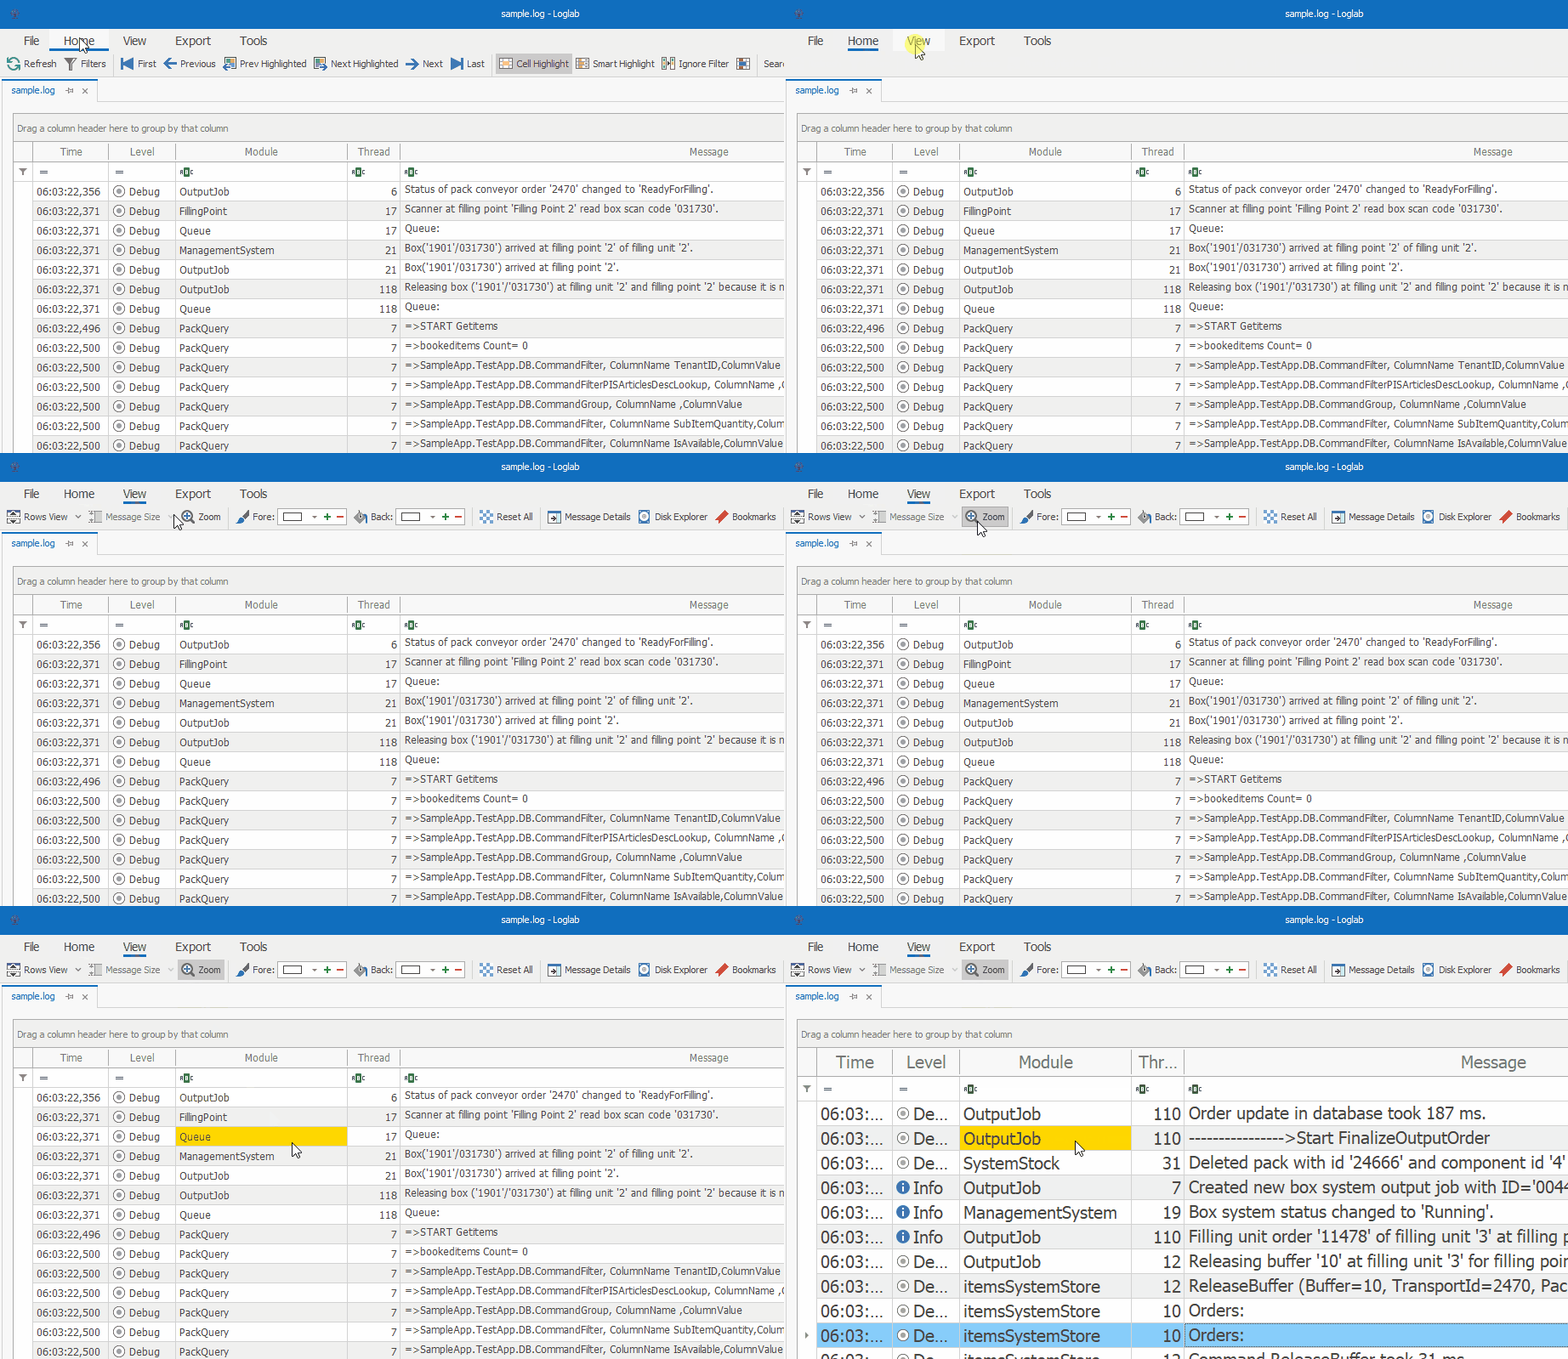
- Log Entries Grid Zoom:
- Users can enable the zoom option in the Ribbon's View tab to zoom in and out of the log entries grid.
- Once enabled, users can use the mouse wheel to adjust the zoom level, making the log entries larger or smaller as needed for easier viewing.

- Message Details Pane Zoom:
- The Message Details pane contains a slider under the message text box that allows users to zoom in and out of the log message.
- This feature helps users read and analyze detailed log messages more comfortably by adjusting the text size to their preference.
How It Works:
-
Enabling Zoom for Log Entries Grid:
- Navigate to the 'View' tab in the ribbon.
- Enable the zoom option for the log entries grid.
- Use the mouse wheel to zoom in (scroll up) or zoom out (scroll down) of the log entries grid.
-
Zooming in the Message Details Pane:
- Select a log entry from the main grid to view its details in the Message Details pane.
- Use the slider located under the message text box to adjust the zoom level of the log message.
- Slide to the right to zoom in and to the left to zoom out, adjusting the text size as needed.
Use Cases:
- Improved Readability: Zoom in on the log entries grid or message details to make text larger and easier to read, especially helpful for users with visual impairments or when working with small text.
- Detailed Analysis: Use the zoom feature to closely examine the content of log entries and messages, ensuring no detail is missed during analysis.
- Customizable View: Adjust the zoom level to suit your personal preference or specific needs, providing a comfortable and efficient working environment.
Benefits:
- Flexibility: Offers adjustable zoom levels for both the log entries grid and message details, catering to different viewing preferences.
- Convenience: Simple and intuitive controls for zooming using the mouse wheel and slider, making it easy to adjust the display on-the-fly.
- Enhanced User Experience: Improves the overall usability of LogLab by allowing users to customize the display for optimal readability and analysis.

Log Profiles
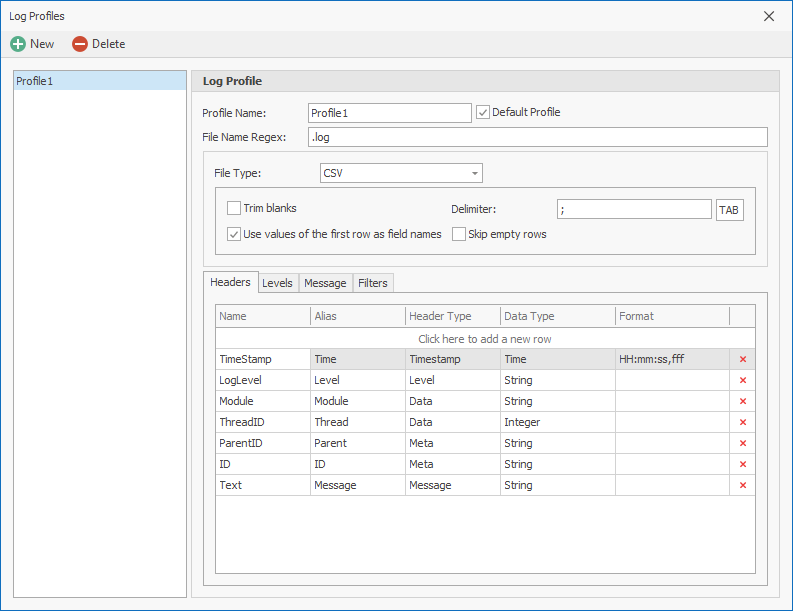
The Log Profiles feature in LogLab allows users to define specific settings that LogLab will apply when opening log files. By creating log profiles, users can streamline the process of configuring log file parameters, ensuring consistency and efficiency in log analysis. This feature supports detailed customization of log file handling, from defining headers and log levels to setting up filters and message pane settings.
Key Features:
-
Profile Definition:
- Users can create and name log profiles, specifying criteria for log file names using REGEX.
- Select the file type; currently, LogLab supports CSV log files.
-
Headers Tab:
- Define headers for the log files with the following attributes:
- Name: The actual name of the header in the log file.
- Alias: The display name used in the grid.
- Header Type: Can be one of the following:
- Timestamp: For date-time values.
- Level: For log level values.
- Message: For the log message value, which will be shown in the Message details pane.
- Data: For data columns that will appear in the log entries grid and can have filters applied.
- Meta: For extra values that will not be shown in the log entries grid and do not require filtering; they will appear in the Meta Data pane.
- Define headers for the log files with the following attributes:
-
Levels Tab:
- Define log level values and assign aliases and images for each log level.
- Customize how log levels are displayed and interpreted in the log entries grid.
-
Message Tab:
- Define settings for the Message pane, including how the message value will be highlighted.
-
Filters Tab:
- Display and manage saved filter criteria specific to the log profile.
How It Works:
-
Creating a Log Profile:
- Open the Log Profiles window from the Ribbon's 'File' menu.
- Define the profile name and set the log file name REGEX criteria.
- Select the file type (currently, CSV is supported).
-
Configuring Headers:
- Navigate to the Headers tab.
- Define each header's name, alias, and type (Timestamp, Level, Message, Data, Meta).
-
Setting Up Log Levels:
- Navigate to the Levels tab.
- Define log levels, assign aliases, and choose images for each level.
-
Customizing Message Pane:
- Navigate to the Message tab.
- Define settings for how the message content will be displayed and highlighted in the Message details pane.
-
Managing Filters:
- Navigate to the Filters tab.
- View and manage saved filter criteria that will be applied when the log profile is used.

Search & Filters
The Search & Filters feature in LogLab empowers users to efficiently sift through large volumes of log data, pinpointing relevant entries with ease. By providing robust search capabilities and customizable filter options, LogLab ensures that users can quickly locate specific log entries and focus on the data that matters most. This feature is essential for effective log analysis, helping users to identify issues, track events, and gain insights from their log files.
Key Components:
-
Search Functionality:
- Perform quick searches within the log entries grid using keywords or phrases.
- Navigate through search results easily with dedicated keyboard shortcuts.
-
Custom Filters:
- Create and apply custom filters to narrow down log entries based on various criteria such as severity, date, and specific message content.
- Save and manage filters for future use, allowing for consistent and repeatable log analysis.
Benefits:
- Efficiency: Quickly locate and analyze relevant log entries without manually scanning through large datasets.
- Precision: Use custom filters to focus on specific log entries that meet defined criteria, ensuring targeted analysis.
- Flexibility: Combine search and filter capabilities to tailor the log data view to your specific needs and preferences.
The Search & Filters feature in LogLab is designed to streamline the log analysis process, making it easier for users to manage and interpret their log data effectively.

General Search
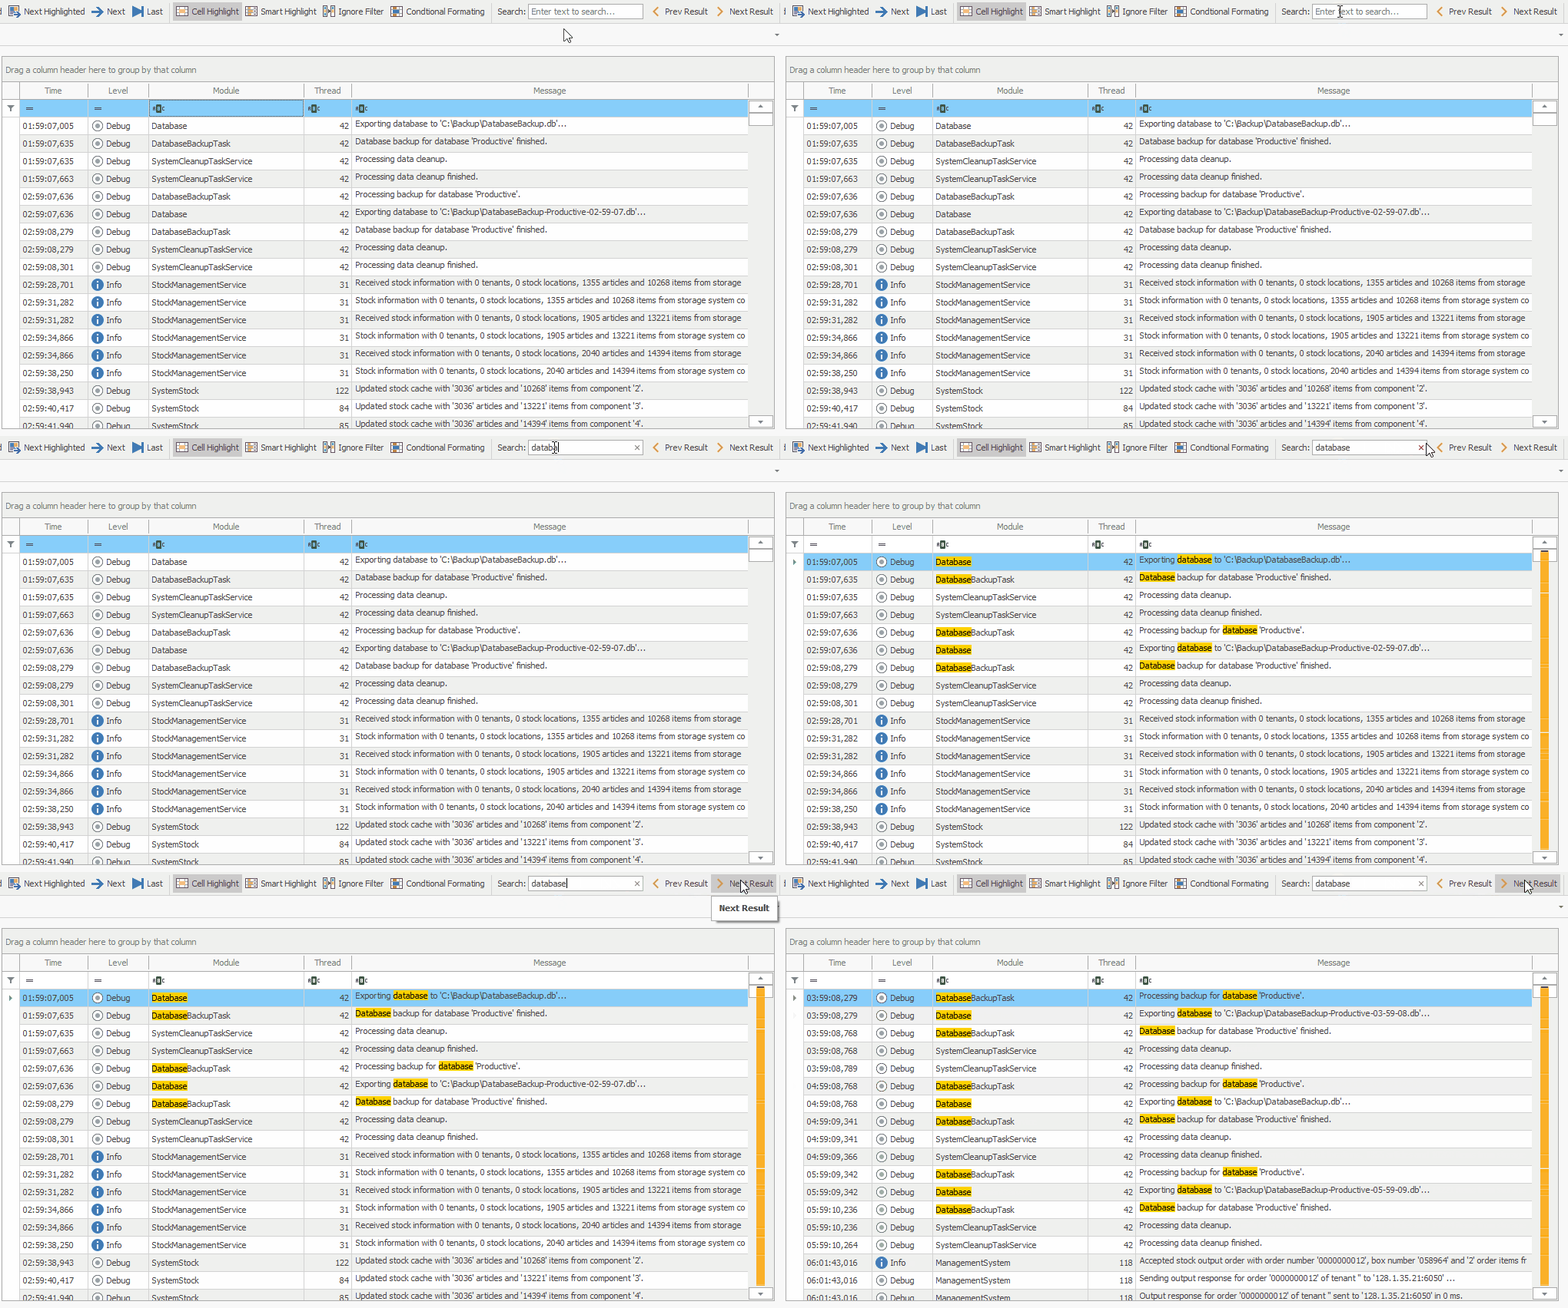
The General Search feature in LogLab enables users to quickly locate specific log entries by searching across all columns in the log entries grid. This powerful search functionality is accessible via the search text box in the Ribbon's Home tab, making it easy to perform comprehensive searches and navigate through the results.
Key Features:
-
Search Across All Columns:
- Enter a keyword or phrase in the search text box located in the Home tab of the Ribbon.
- The search is applied to all columns in the log entries grid, ensuring that no relevant data is missed.
-
Highlighted Search Results:
- Matching log entries are highlighted in the grid, allowing users to easily identify and focus on the relevant entries.
-
Navigation Options:
- Keyboard Navigation:
- Use the following keyboard shortcuts to navigate through the search results efficiently:
Ctrl + Arrow Upto move to the previous search result.Ctrl + Arrow Downto move to the next search result.
- Use the following keyboard shortcuts to navigate through the search results efficiently:
- Navigation Buttons:
- Use the 'Prev Result' and 'Next Result' buttons located beside the search text box to navigate through the search results.
- Keyboard Navigation:
How It Works:
-
Performing a Search:
- Navigate to the Home tab in the Ribbon.
- Enter your search term in the search text box.
- Press Enter to initiate the search.
-
Viewing Search Results:
- Log entries that match the search term will be highlighted in the grid.
- Use the scroll bar, keyboard navigation, or navigation buttons to review the highlighted entries.
-
Navigating Search Results:
- Press
Ctrl + Arrow Upor click the 'Prev Result' button to jump to the previous highlighted search result. - Press
Ctrl + Arrow Downor click the 'Next Result' button to jump to the next highlighted search result.
- Press
Benefits:
- Efficiency: Quickly locate specific log entries without manually scanning through the entire log file.
- Comprehensiveness: Searches are applied to all columns, ensuring that all relevant data is included in the results.
- Ease of Use: Simple and intuitive search functionality, with convenient keyboard shortcuts and buttons for navigating results.
The General Search feature in LogLab provides a powerful and user-friendly way to search and navigate through log entries, enhancing the efficiency and effectiveness of log analysis.

Grid Filters
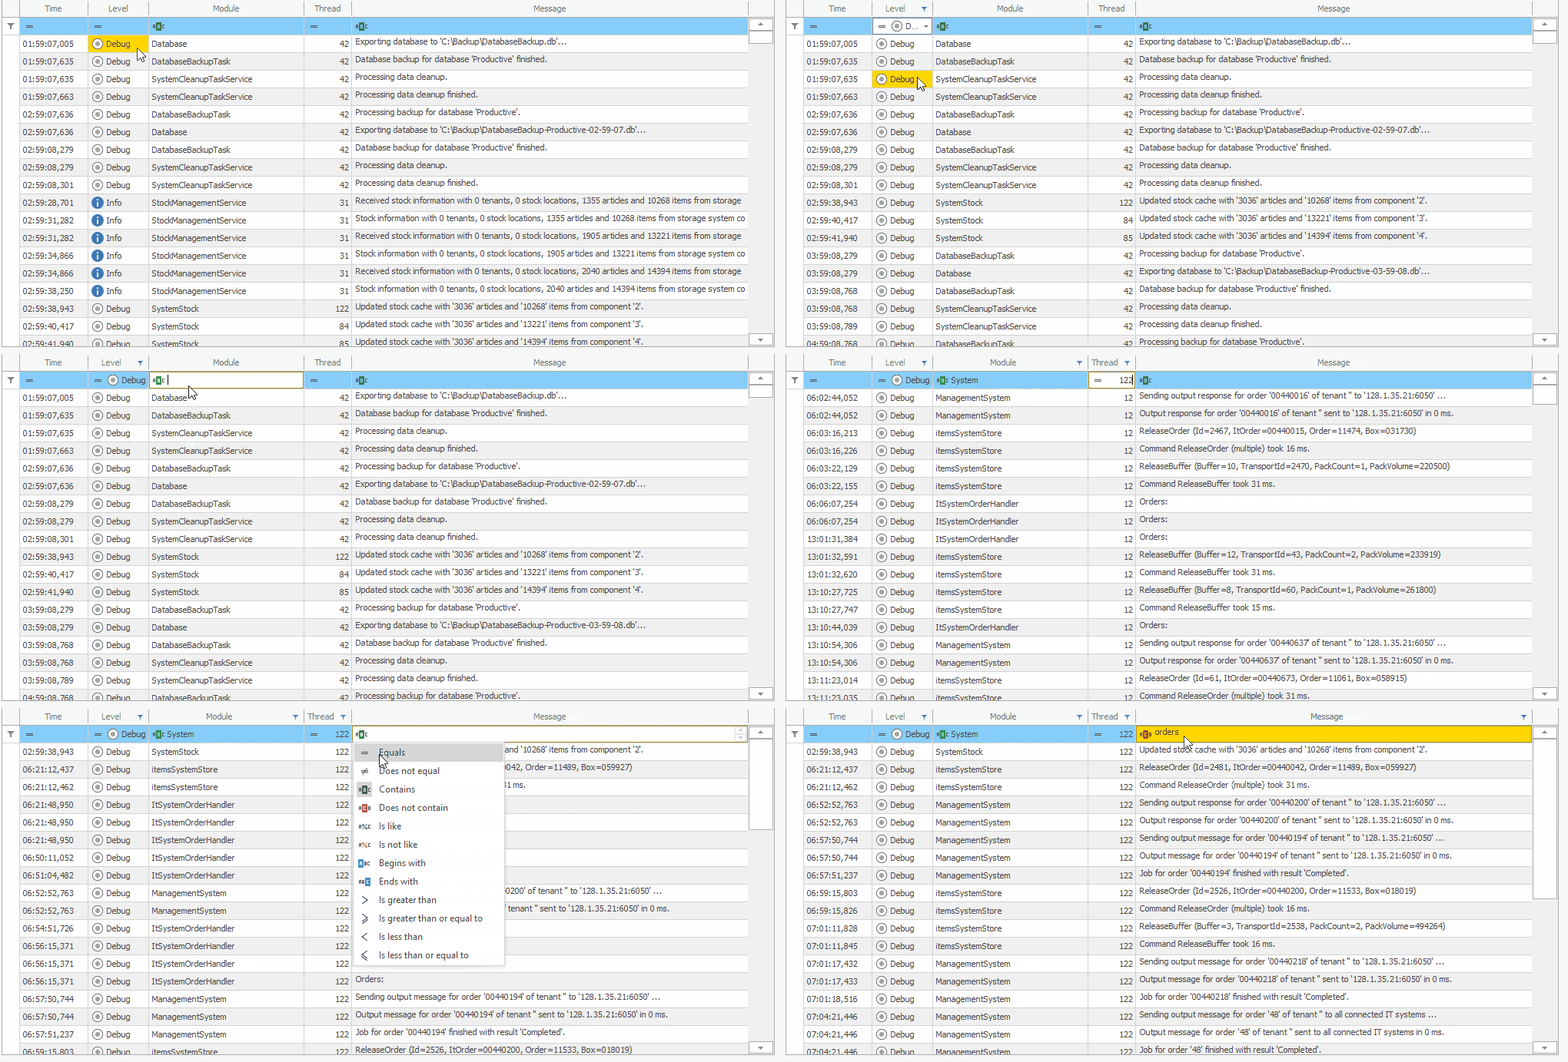
The Grid Filters feature in LogLab allows users to refine their log data by applying filters directly to the log entries grid columns. This functionality provides a flexible and powerful way to narrow down log entries based on specific criteria, helping users to focus on the most relevant information.
Key Features:
-
Column-Specific Filtering:
- Users can apply filters to individual columns in the log entries grid, specifying the criteria for each filter.
-
Various Filter Types:
- Choose from a wide range of filter types to tailor the filtering criteria:
- Equal: Show entries where the column value is equal to the specified value.
- Not Equal: Show entries where the column value is not equal to the specified value.
- Contains: Show entries where the column value contains the specified text.
- Does Not Contain: Show entries where the column value does not contain the specified text.
- Starts With: Show entries where the column value starts with the specified text.
- Ends With: Show entries where the column value ends with the specified text.
- Greater Than: Show entries where the column value is greater than the specified value.
- Less Than: Show entries where the column value is less than the specified value.
- Between: Show entries where the column value falls within the specified range.
- Choose from a wide range of filter types to tailor the filtering criteria:
-
Combine Filters:
- Apply multiple filters across different columns to achieve more specific and targeted results.
How It Works:
-
Applying a Filter:
- Click on the filter icon in the column header of the log entries grid.
- Select the desired filter type (Equal, Contains, Does Not Contain, etc.).
- Enter the filter value and apply the filter.
-
Combining Filters:
- Apply filters to multiple columns by repeating the steps above for each column.
- The grid will display log entries that meet all the specified filter criteria.
-
Managing Filters:
- Users can edit or remove filters by clicking on the filter icon again and adjusting the filter settings or clearing the filter.
Benefits:
- Focused Analysis: Allows users to concentrate on specific log entries that match the defined criteria, reducing the noise and improving clarity.
- Flexibility: Multiple filter types and the ability to combine filters provide a high degree of customization for data filtering.
- Efficiency: Quickly narrow down log entries to the most relevant subset, enhancing the efficiency of log analysis.

Filter Builder
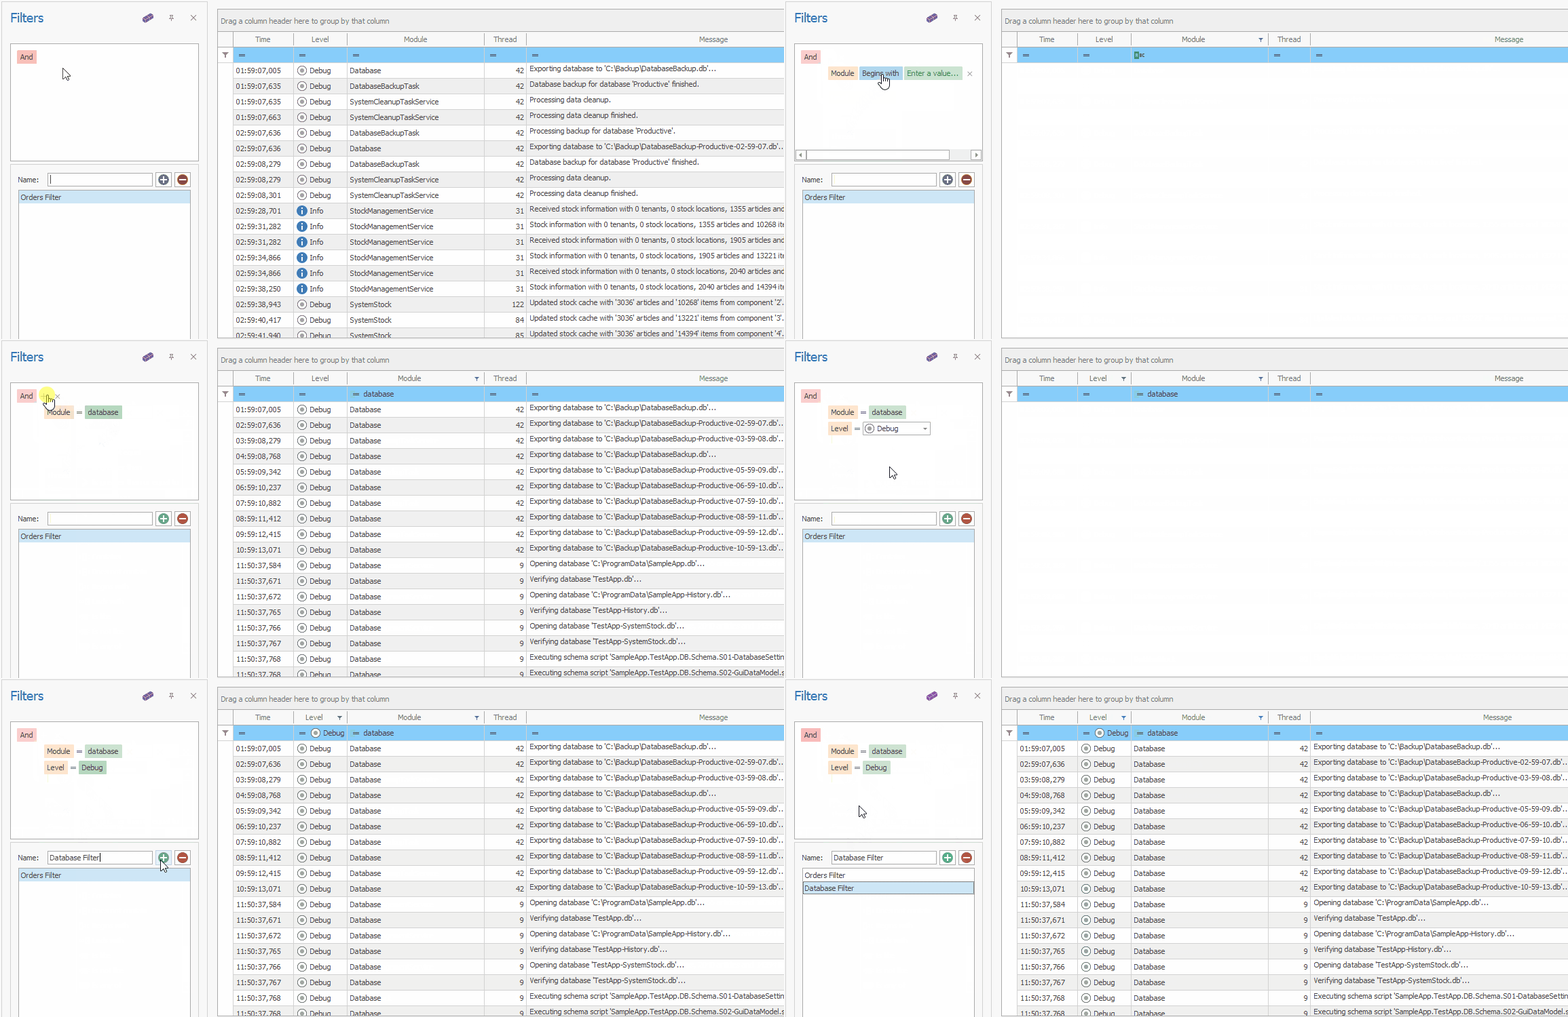
The Filter Builder feature in LogLab empowers users to construct complex filter criteria with unlimited conditions, enabling detailed and precise log data analysis. By combining multiple filter conditions using logical operators, users can create sophisticated filters tailored to their specific needs. Additionally, the Filter Builder allows users to save and reset filter criteria, enhancing flexibility and efficiency in log analysis.
Key Features:
-
Unlimited Filter Conditions:
- Users can add as many filter conditions as needed to refine their log data.
- Combine filter conditions using logical operators such as AND and OR to create complex filter criteria.
-
Logical Operators:
- AND: All conditions combined with AND must be true for a log entry to be included in the results.
- OR: Any condition combined with OR must be true for a log entry to be included in the results.
-
Clear Filter Criteria:
- Users can easily reset the filter criteria by clicking the clear button, removing all conditions and restoring the default view.
-
Save and Reapply Filters:
- Save custom filter criteria for future use.
- Reapply saved filters to quickly filter log entries according to previously defined criteria.
How It Works:
-
Building a Filter:
- Open the Filter Builder panel.
- Add filter conditions by selecting columns, choosing filter types, and entering values.
- Combine conditions using logical operators (AND, OR) to build complex filter criteria.
-
Applying the Filter:
- Apply the built filter to the log entries grid to view the filtered results.
- Adjust or refine filter conditions as needed to narrow down the log entries further.
-
Managing Filters:
- Clear Filters: Click the clear button to reset all filter conditions and return to the default view.
- Save Filters: Save the current filter criteria for future use by providing a name for the filter.
- Reapply Filters: Select and apply saved filters from the saved filters panel to quickly filter log entries according to predefined criteria.
Benefits:
- Precision: Create highly specific filters with multiple conditions to focus on the most relevant log entries.
- Flexibility: Combine unlimited filter conditions using logical operators for comprehensive data analysis.
- Convenience: Save and reapply filter criteria to streamline repetitive filtering tasks and maintain consistency in log analysis.

Bookmarks
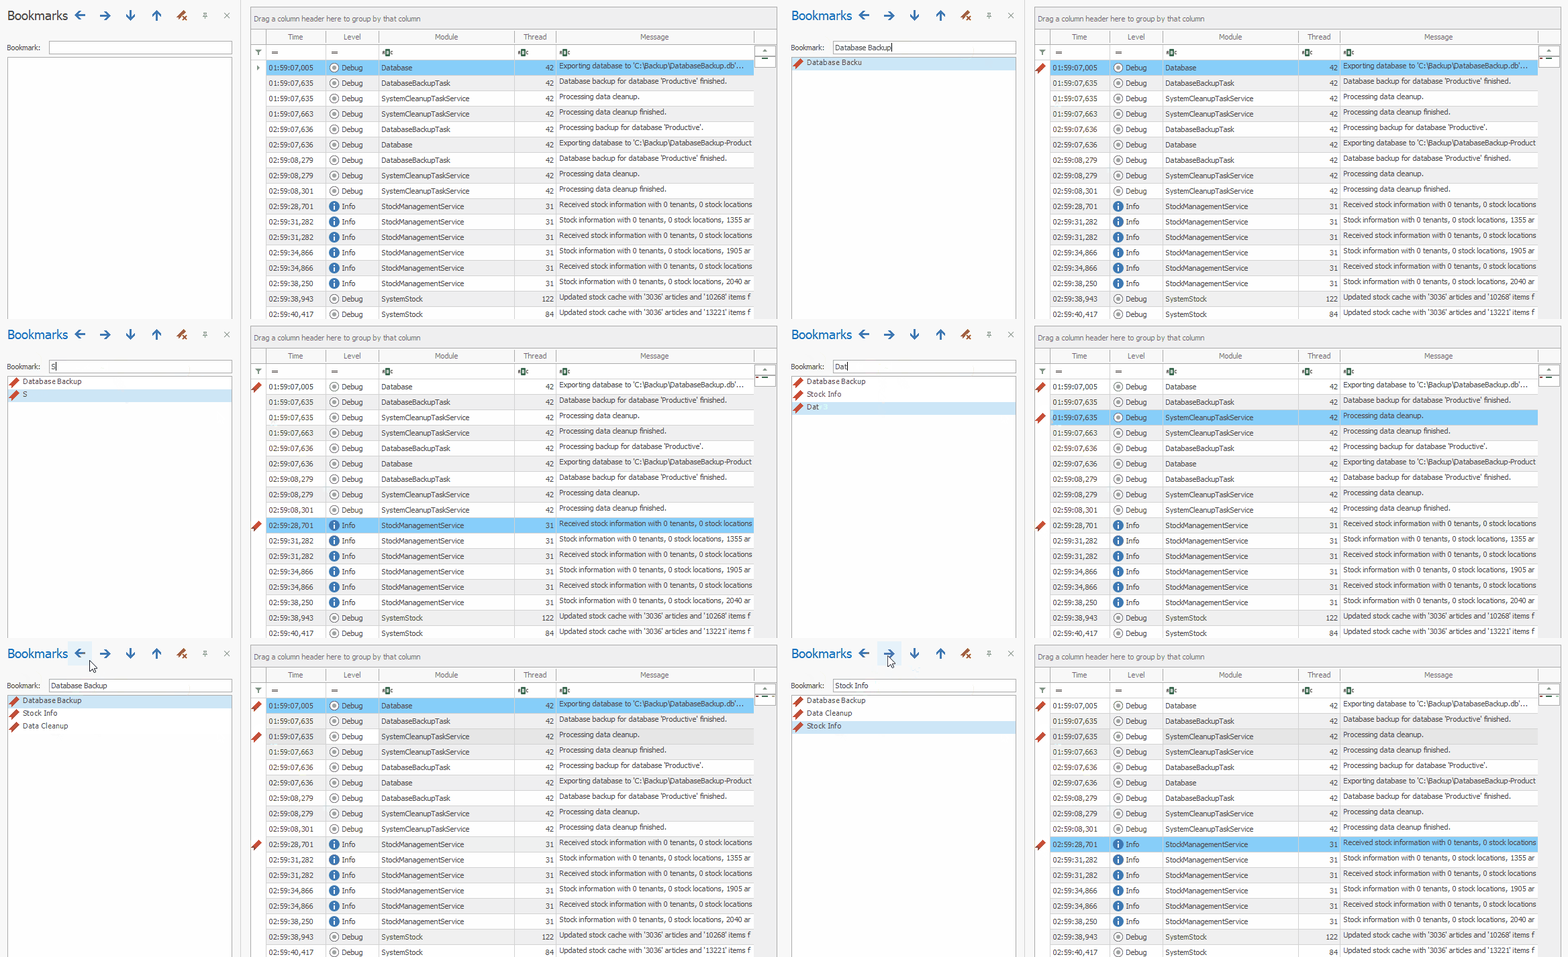
The bookmarks feature in LogLab is designed to enhance your log analysis workflow by allowing you to easily mark, navigate, and manage important log entries. Whether you need to monitor recurring issues, track critical events, or revisit specific log entries for further analysis, bookmarks provide a convenient way to organize and prioritize your log data.
Key Features:
-
Quick Access: Instantly jump to bookmarked log entries from the bookmarks panel, saving you time and effort when navigating large log files.
-
Flexible Management: Create, edit, and delete bookmarks with ease, ensuring that your log views remain organized and relevant to your current tasks.
-
Search Integration: Seamlessly integrate bookmarks with the search functionality to quickly locate and highlight bookmarked entries within your search results.
How It Works:
-
Marking a Bookmark:
- Navigate to the log entry you want to bookmark.
- Double click on the blank area next to the log entry or use (Ctrl + B) keyboard shortcut to add/remove it to your bookmarks list.
-
Managing Bookmarks:
- Access all your bookmarks from the dedicated bookmarks panel.
- Use options to rename, edit the notes for, or remove bookmarks as needed to reflect changes in your log analysis process.
-
Navigating with Bookmarks:
- Quickly jump between bookmarked log entries using the bookmarks panel, allowing for efficient review and comparison of critical log data.
Use Cases:
- Troubleshooting: Mark logs that require further investigation or follow-up actions, helping you to systematically address and resolve issues.
- Monitoring Critical Events: Keep track of system errors, warnings, or important transactions by bookmarking significant log entries.

Highlights and Coloring
The Highlights and Coloring feature in LogLab provides powerful tools to visually distinguish and categorize log entries, enhancing the readability and analysis of log data. By allowing users to apply conditional formatting and custom colors to log entries, this feature helps in quickly identifying critical information, patterns, and anomalies within the log files.
Key Components:
-
Conditional Formatting:
- Create rules to automatically highlight log entries that meet specific conditions, such as severity levels, keywords, or date ranges.
- Customize the appearance of highlighted entries with different colors and styles to make them stand out.
-
Row Coloring:
- Manually set the foreground or background color for individual log entries using a right-click menu or ribbon buttons.
- Navigate through colored rows using the ribbon, making it easy to move between significant log entries.
Benefits:
- Improved Readability: Enhances the visibility of important log entries, making it easier to scan and analyze large volumes of data.
- Quick Identification: Helps in swiftly locating critical events, errors, or patterns within the log files through visual cues.
- Customization: Provides flexibility to apply and manage colors according to user preferences and specific analysis needs.
The Highlights and Coloring feature in LogLab is designed to augment the log analysis process by providing visual differentiation, ensuring that key information is easily accessible and identifiable.

Rows Coloring Feature
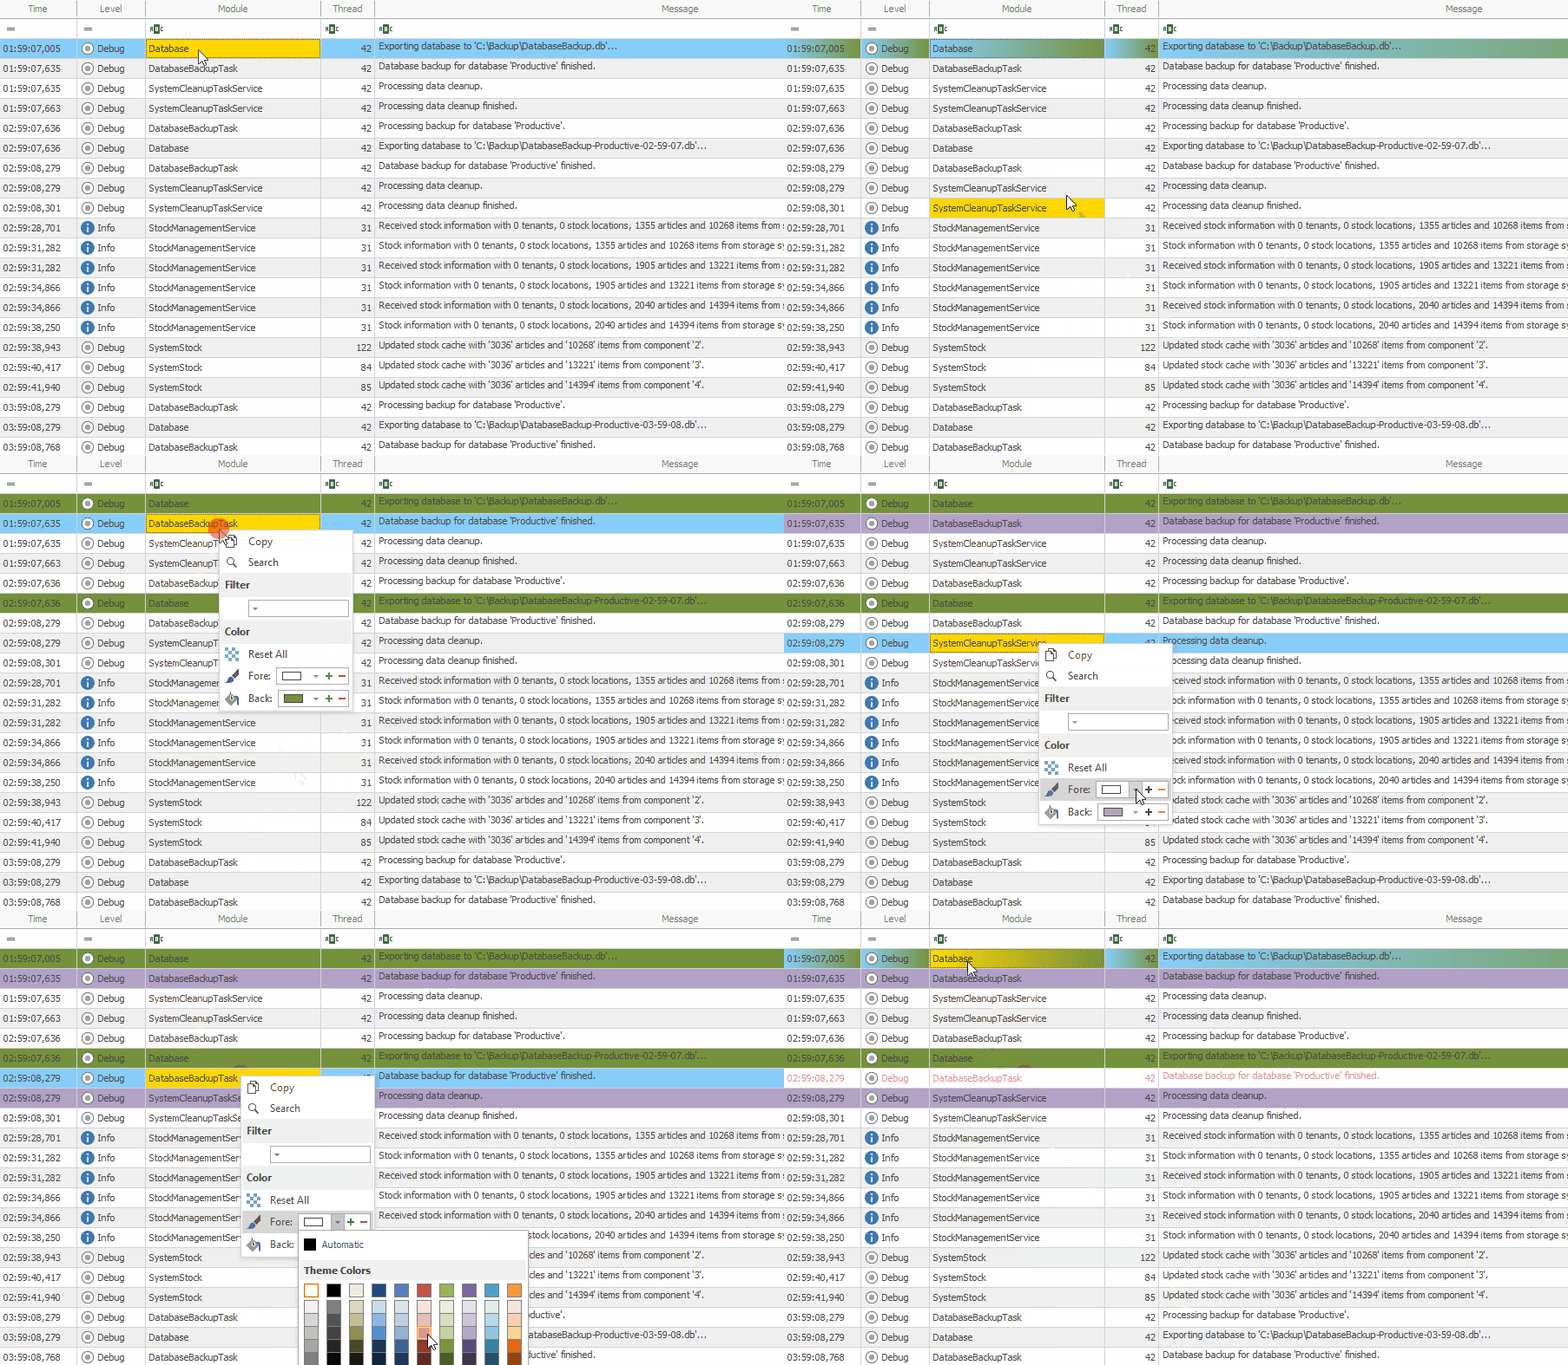
The rows coloring feature in LogLab allows users to visually distinguish log entries by setting foreground or background colors. This can be done easily with a right-click or by using the ribbon buttons. Additionally, users can navigate through the colored rows using the ribbon, making it simpler to focus on and analyze important log entries.
Key Features:
-
Foreground and Background Coloring: Set custom foreground or background colors for log entries to visually differentiate and prioritize them.
-
Easy Access: Apply colors using a right-click menu or the ribbon buttons for quick and intuitive operation.
-
Navigation Through Colored Rows: Use the ribbon buttons to jump between colored rows, enhancing the efficiency of log review and analysis.
How It Works:
-
Applying Colors:
- Right-Click Method:
- Right-click on the log entry you want to color.
- Select "Set Foreground Color" or "Set Background Color" from the context menu.
- Choose the desired color from the color picker.
- Ribbon Buttons Method:
- Select the log entry.
- Click the "Set Foreground Color" or "Set Background Color" button in the ribbon.
- Choose the desired color from the color picker.
- Right-Click Method:
-
Navigating Colored Rows:
- Use the navigation buttons in the ribbon to move between colored rows:
- Next Colored Row:

- Previous Colored Row:

- Next Colored Row:
- Use the navigation buttons in the ribbon to move between colored rows:
Use Cases:
- Highlighting Important Entries: Use colors to mark critical log entries, making them stand out for quick identification during review.
- Categorizing Logs: Apply different colors to categorize logs by type, severity, or any other criteria relevant to your analysis.
- Enhanced Focus: Navigate through colored rows to stay focused on key log entries without getting distracted by less important data.

Conditional Formatting
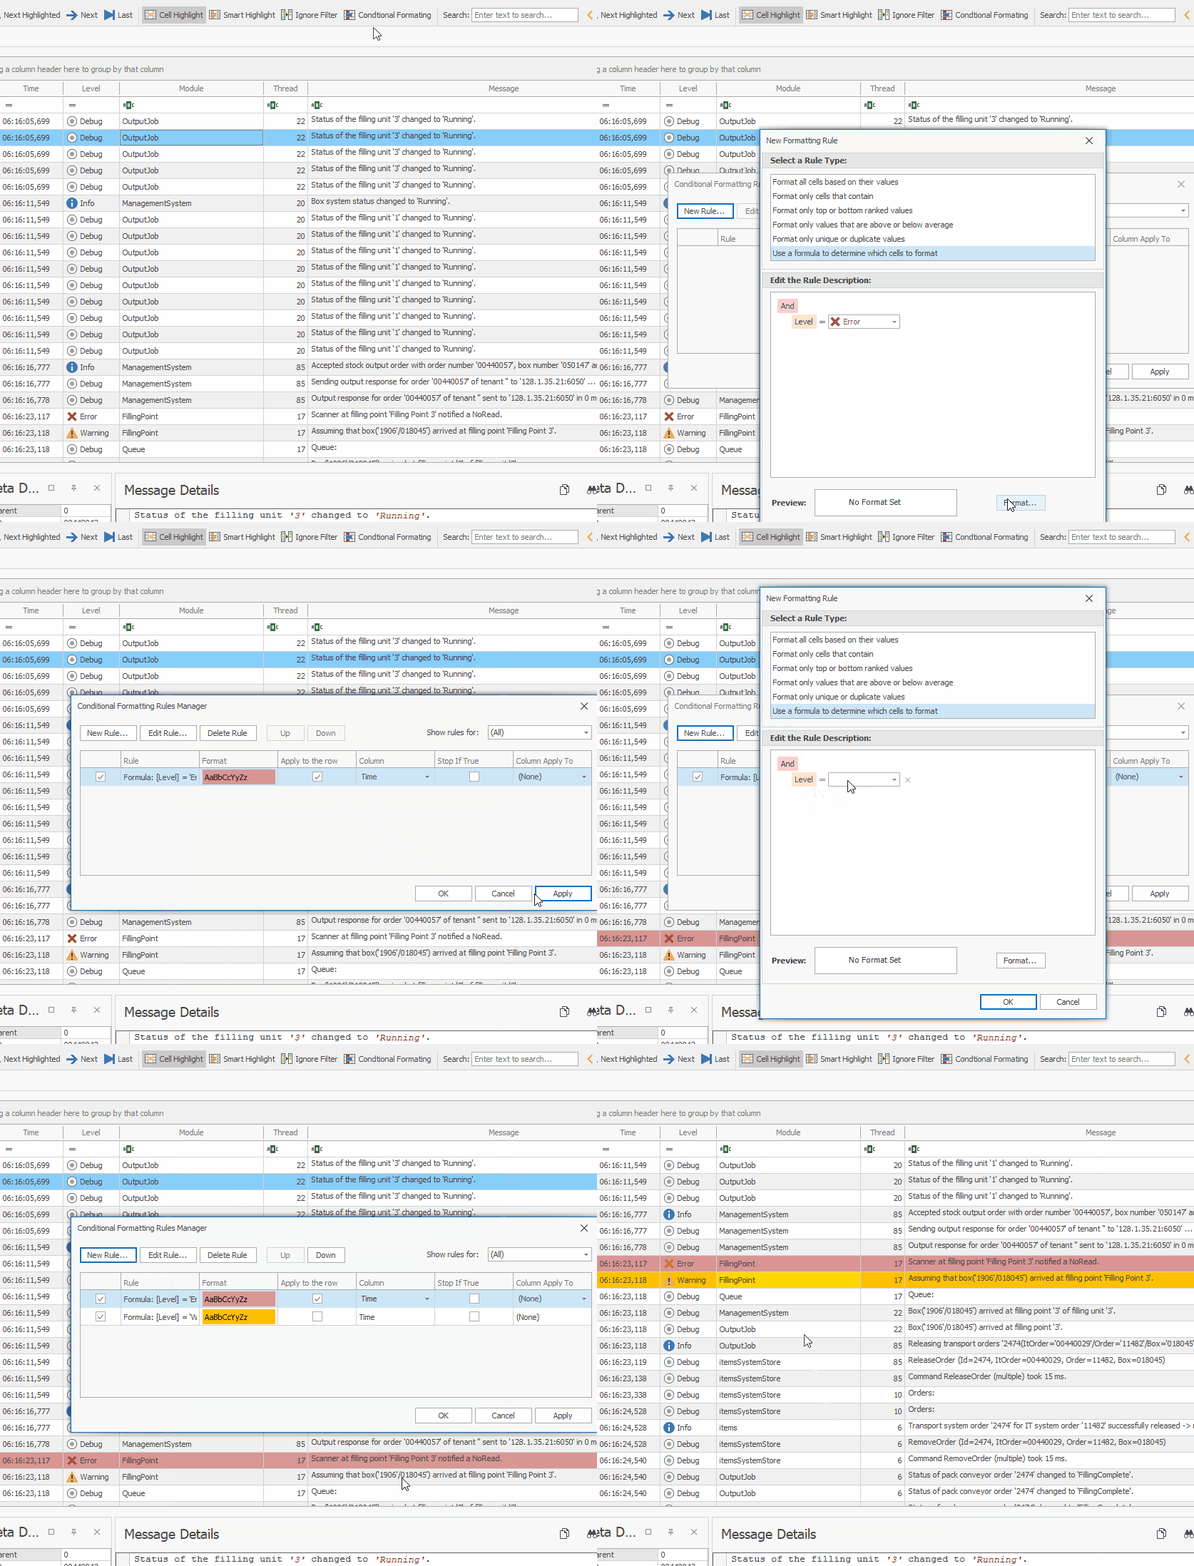
The Highlights feature in LogLab allows users to create conditional formatting rules to automatically highlight log entries based on specific criteria. This powerful tool enhances log analysis by visually emphasizing important entries, making it easier to identify and focus on significant data.
Key Features:
-
Conditional Formatting: Define rules that automatically apply formatting to log entries that meet specified conditions.
-
Customizable Criteria: Create rules based on various log entry attributes such as text content, severity level, and more.
-
Automatic Highlighting: Log entries that match the defined criteria are highlighted automatically, ensuring important data stands out.
How It Works:
-
Creating a Highlight Rule:
- Open the Conditional Formating from the LogLab interface.
- Click on "New Rule" to create a new conditional formatting rule.
- Define the criteria for the rule (e.g., log level, specific keywords, date ranges).
- Choose the formatting options, such as background color, foreground color, font style, etc.
- Save the rule to apply it to the log entries.
-
Managing Highlight Rules:
- Access the list of existing highlight rules from the Conditional Formating.
- Edit or delete rules as needed to refine your log analysis criteria.
- Reorder rules to prioritize which conditions are checked first.
-
Automatic Highlighting:
- Log entries that match any of the defined rules will be highlighted automatically according to the specified formatting options.
- Adjust highlight settings and rules dynamically as your analysis requirements evolve.
Use Cases:
- Error Detection: Highlight log entries with error levels or specific error messages to quickly identify and address issues.
- Pattern Recognition: Use highlights to mark log entries that follow specific patterns, helping to uncover trends and anomalies.
- Custom Alerts: Set up rules to highlight entries containing critical keywords or phrases that warrant immediate attention.

Tools
LogLab offers a comprehensive set of tools designed to enhance the log analysis process, providing users with the necessary functionalities to efficiently manage and interpret their log data. The Tools tab in the ribbon includes various utilities that aid in documentation, customization, and additional analysis, making LogLab a versatile and powerful application for log management.
Key Tools:
-
Memo Tool:
- A free text editor for taking notes, recording keywords, or jotting down observations during log analysis. These notes can be used later for searching or comparing log entries.
-
Screenshot Tool:
- Allows users to capture and save snapshots of the LogLab interface or log entries grid. This tool is useful for creating visual documentation, sharing findings, and reporting issues.

Memo Tool
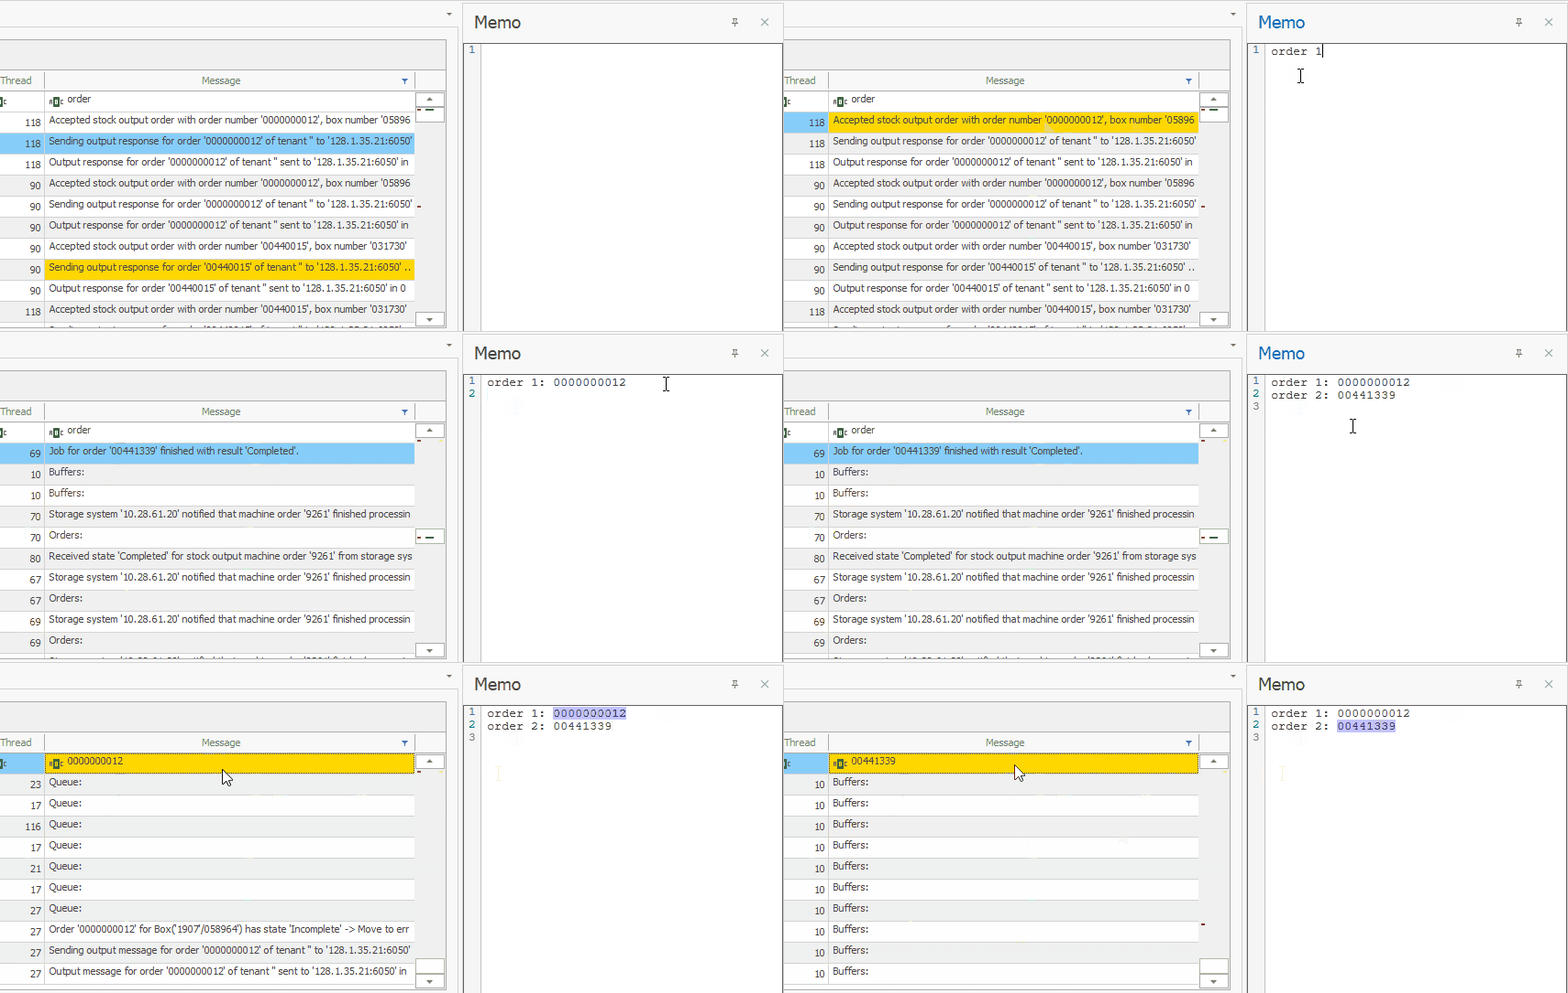
The memo tool in LogLab offers a versatile and user-friendly free text editor, allowing you to take notes and record keywords directly within the application. This feature enhances your log analysis workflow by providing a convenient space to jot down thoughts, observations, or important keywords for future reference, searching, or comparison.
Key Features:
-
Free Text Editor: Write and organize your notes freely without any constraints, enabling you to capture detailed observations or brief keywords as needed.
-
Integrated Search: Use your notes and keywords for searching within log entries, making it easier to locate relevant data and draw connections between different log events.
-
Comparison Aid: Leverage your memos to compare log entries, helping you to identify patterns, inconsistencies, or recurring issues over time.
How It Works:
-
Creating a Memo:
- Open the memo tool from the LogLab interface.
- Type your notes or keywords into the free text editor.
-
Using Memos for Search:
- Enter your saved keywords or notes into the search function to quickly locate matching log entries.
-
Comparing Log Entries:
- Refer to your memos while reviewing log entries to draw comparisons and identify patterns.
- Use notes to track changes, progress, or recurring issues during your log analysis.
Use Cases:
- Detailed Note-taking: Record detailed observations during log analysis sessions, capturing context and insights that can be referenced later.
- Keyword Tracking: Save important keywords or phrases that you frequently search for, streamlining your log investigation process.
- Pattern Identification: Use memos to compare log entries over time, helping to identify patterns, trends, or anomalies that require attention.

Screenshot Tool

The Screenshot tool in LogLab allows users to capture a selected area of the LogLab window and save it as an image. This feature is particularly useful for sharing specific log details or visual analysis with others, facilitating collaboration and communication.
Key Features:
-
Select Area:
- Users can choose a specific area of the LogLab window to capture. This allows for precise screenshots that focus on the most relevant information.
-
Save as Image:
- The selected area can be saved as an image file, making it easy to store, share, and reference later.
-
Shareability:
- Captured screenshots can be shared with colleagues, support teams, or anyone else who needs to see the log data or analysis.
How It Works:
-
Activate the Screenshot Tool:
- Navigate to the Tools tab in the Ribbon and select the Screenshot tool.
-
Select the Area:
- Click and drag the mouse to select the desired area of the LogLab window. Adjust the selection box to capture exactly what you need.
-
Save the Screenshot:
- Once the area is selected, save the screenshot by choosing the save option and selecting the file format and location on your computer.

Export
The export feature in LogLab allows users to save and share their log entries in various formats. With just a few clicks, users can export log data to PDF, XLS, or XLSX files using the buttons provided in the Export page of the ribbon. This functionality makes it easy to document and distribute log information for reporting, analysis, or archival purposes.

Key Features:
-
Multiple Export Formats: Export log entries to PDF, XLS, or XLSX formats, catering to different documentation and data analysis needs.
-
Easy Access: Use the Export page in the ribbon to quickly access export options.
-
Customizable Exports: Use filters to specificy log entries to export, ensuring that only relevant data is included in the exported file.
How It Works:
-
Exporting to PDF:
- Navigate to the Export page in the ribbon.
- Click the "Export to PDF" button.
- Specify the desired export settings, such as the export file name.
- Click "Export" to generate the PDF file.
-
Exporting to XLS:
- Navigate to the Export page in the ribbon.
- Click the "Export to XLS" button.
- Specify the desired export settings, such as the export file name.
- Click "Export" to create the XLS file.
-
Exporting to XLSX:
- Navigate to the Export page in the ribbon.
- Click the "Export to XLSX" button.
- Specify the desired export settings, such as the export file name.
- Click "Export" to produce the XLSX file.
Use Cases:
- Reporting: Export log entries to PDF for easy sharing and presentation in meetings or reports.
- Data Analysis: Export to XLS or XLSX formats for in-depth analysis using spreadsheet tools like Microsoft Excel.
- Archival: Save logs in a durable format for long-term storage and future reference.

Keyboard Shortcuts
LogLab supports a variety of keyboard shortcuts to enhance user efficiency and streamline navigation. These shortcuts provide quick access to common actions and navigation within the log entries grid.
Supported Shortcuts:
-
Open a New File:
Ctrl + O- Use this shortcut to quickly open a new log file, providing a fast way to load new data for analysis.
-
Bookmark/Unbookmark Log Entry Row:
Ctrl + B- Press this shortcut to bookmark or unbookmark the currently selected log entry row. This helps you mark important entries for easy reference.
-
Navigate Log Entries Grid:
Arrow Up- Moves the selection one row up in the log entries grid.
Arrow Down- Moves the selection one row down in the log entries grid.
-
Navigate Search Results:
Ctrl + Arrow Up- Moves the selection to the previous search result in the log entries grid.
Ctrl + Arrow Down- Moves the selection to the next search result in the log entries grid.
Benefits:
- Efficiency: Keyboard shortcuts allow for quicker access to common actions, reducing the need for mouse navigation and enhancing productivity.
- Convenience: Easily bookmark important log entries or navigate through log data using simple key combinations.
- Improved Navigation: Quickly move between search results and log entries, making it easier to locate and analyze specific data.
By utilizing these keyboard shortcuts, LogLab users can significantly improve their workflow, making log analysis faster and more efficient.

Opening Log Files from the Command Line
LogLab provides a convenient way to open log files directly from the command line. By calling LogLab.exe and passing the log file path as a parameter, users can quickly launch LogLab with the specified log file already loaded. This feature streamlines the process of accessing and analyzing log files, especially for users who prefer command line operations or need to automate log file opening.
How It Works:
-
Opening a Log File:
-
Open the command prompt on your Windows system.
-
Navigate to the directory where
LogLab.exeis located, or ensure that the directory is included in your system's PATH variable. -
Use the following command to open a log file with LogLab:
LogLab.exe "path\to\your\logfile.log" -
Replace
"path\to\your\logfile.log"with the actual path to your log file.
-
-
Example:
-
If
LogLab.exeis located inC:\Program Files\LogLaband your log file is located inC:\Logs\example.log, the command would be:"C:\Program Files\LogLab\LogLab.exe" "C:\Logs\example.log"
-
Use Cases:
- Quick Access: Open log files directly from the command line for rapid access and analysis without navigating through the graphical user interface.
- Automation: Integrate LogLab into scripts or batch files to automate the process of opening and analyzing log files.
- Efficiency: Save time by launching LogLab with the desired log file already loaded, reducing the steps needed to start your log analysis.
Benefits:
- Convenience: Easily open log files from any location using the command line.
- Speed: Quickly start LogLab with the specific log file you need to analyze.
- Flexibility: Combine this feature with other command line operations to create efficient workflows and automation scripts.